

Starlink is fast when it works, but those random 30 to 60-second drops will kill you. A payment terminal freezes mid-sale. A cloud file stalls just before upload. Your VPN kicks you out while you’re working. Everything looks “online,” yet nothing moves, unless you use an ASUS RT-AX failover setup for Starlink to keep your connection stable.
This is why I use an ASUS RT-AX router. With proper Dual WAN failover, it switches you to backup internet automatically, so Starlink hiccups disappear. The problem? ASUS failover sucks out of the box. You need the right settings.
This guide gives you the exact, tested setup that keeps you connected. No beating around, no extras, just what works.
Table of Contents
Why Your Starlink Connection Keeps Dropping (How an ASUS Router Helps)
Starlink doesn’t usually “crash” the way old DSL or cable did. Instead, it has micro-outages. A passing storm can block the dish for half a minute. When your terminal switches satellites overhead, there’s a 5 to 15 second gap. Even routine system updates can cause the link to pause. From your side, the Wi-Fi stays on, but every connection (file uploads, logins, game sessions) stalls.
This is where an ASUS router comes in handy. The RT-AX series supports Dual WAN with failover: you keep Starlink as your main connection, but a second internet source (like 5G or DSL) sits on standby. When Starlink freezes, the ASUS automatically switches over so your apps don’t even notice.
Here’s the problem: stock ASUS failover is garbage unless you tune it. Out of the box, it only reacts to physical link loss, and Starlink rarely “drops the cable.” It just keeps handing out an IP while silently refusing to pass traffic. Unless you configure detection properly, the ASUS thinks Starlink is alive while your internet is dead. That’s why getting the right settings is critical: it makes the difference between frustration and a seamless backup.
What You Need for ASUS RT-AX and Starlink Failover Setup

1. ASUS RT-AX Router (failover-capable) Go with models that have proven Dual-WAN support: RT-AX86U, RT-AX88U, RT-AX88U Pro or RT-AX3000 (version 1 only). These work reliably with both ASUS stock firmware and Asuswrt-Merlin. If your work or business depends on failover, Merlin is worth it. It adds stability, scripting, and better control over WAN switching.
2. Starlink Ethernet Access
- Gen 2 users need the official Ethernet Adapter to enable Bypass Mode. Avoid third-party adapters; they often break failover.
- Gen 3 users don’t need an adapter, since the router already has Ethernet ports. Just enable bypass in the app and connect directly to your ASUS WAN port. Bypass mode is critical. Without it, you’ll get double NAT and failover won’t behave correctly.
3. A Backup Internet Connection This can be LTE/5G, DSL, or a secondary ISP. The important part isn’t speed, it’s predictable DHCP behavior. Starlink leases are unusual and can confuse ASUS failover if your backup ISP has very different lease timings. If possible, ask your provider for a static IP or bridge mode. That way, failover switches cleanly without DHCP fights.
4. Firmware & Scripts (optional, but recommended) If you want bulletproof reliability, flash Asuswrt-Merlin and add the WAN Failover script. This lets you fine-tune ping targets, timeouts, and DHCP renewals. In other words, it solves the “Starlink looks alive but is actually dead” problem that stock firmware struggles with.
5. Quality Cabling and Power Don’t overlook the basics. Use good Cat6 cables for both WAN connections, and if outages cost you money, consider a small UPS to keep both the ASUS and Starlink power supply alive through short power cuts. Otherwise, a flicker looks like an internet failure and triggers an unnecessary switch.
Setup ASUS Dual WAN Failover With Starlink Step by Step
Follow these steps exactly, and you’ll have a failover setup that actually works when Starlink drops.
1. Enable Starlink Bypass Mode
Open the Starlink app → Settings → Bypass Mode.
- Gen 2 users: plug in the official Ethernet Adapter first. “If your bypass mode breaks after a reset, here’s how to fix it guide
- Gen 3 users: Ethernet is built in, so just toggle bypass. This step makes your ASUS the only router. If you skip it, you’ll have double NAT, and failover won’t work correctly. Learn how to enable Bypass mode using your own router
2. Connect Starlink to ASUS
Run a Cat6 cable from the Starlink Ethernet Adapter (or Gen 3 port) to the ASUS WAN port. Then connect your backup internet source (LTE modem, DSL, etc.) into the ASUS secondary WAN port (often LAN3).
3. Configure Dual WAN in ASUS Router GUI
- Open a browser and go to router.asus.com then log in. If you need a refresher on Starlink router settings, check this full configuration guide here
- Navigate to: WAN → Dual WAN.
- Set Starlink = Primary WAN.
- Set Backup ISP = Secondary WAN.
- Mode = Failover (not load balance).
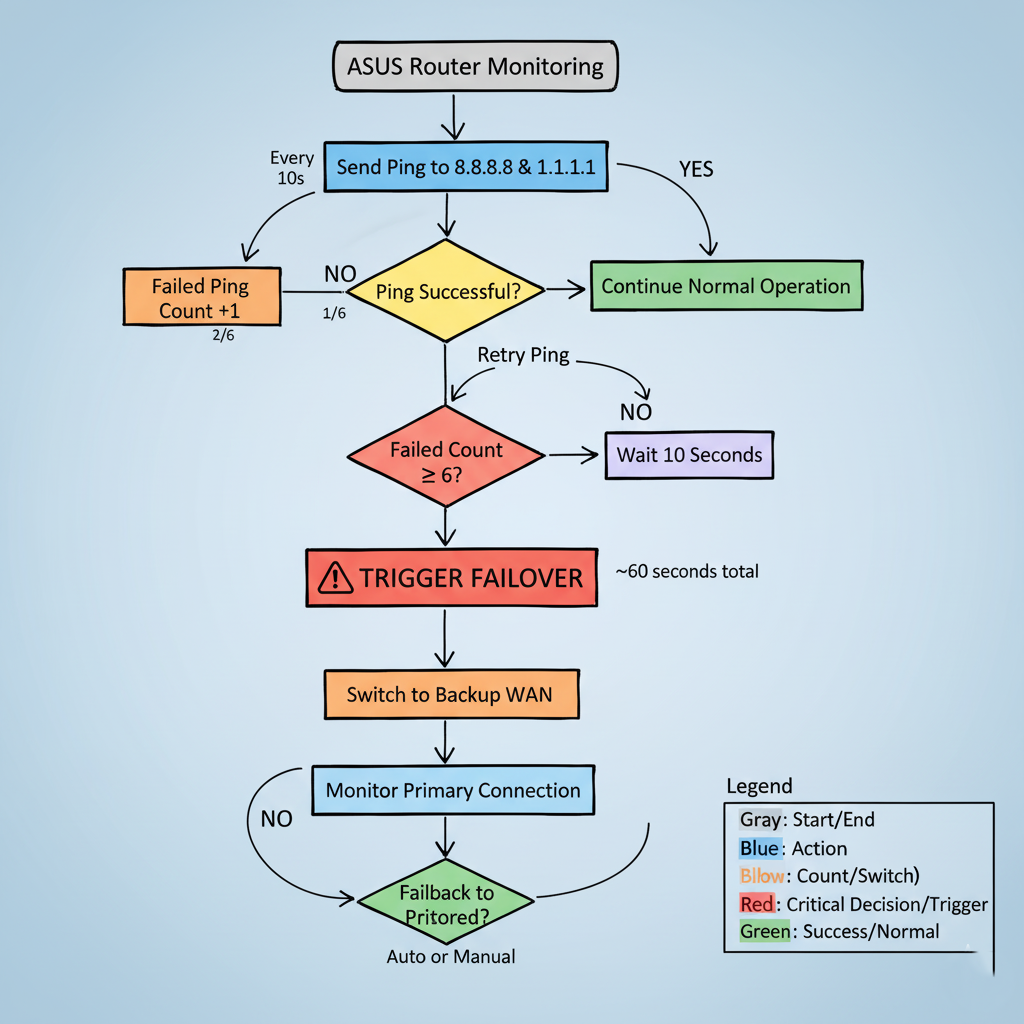
4. Adjust Failover Detection Here’s the critical part. By default, ASUS just checks if the wire is plugged in. That’s useless for Starlink.
- Go to WAN → Internet Connection → Network Monitoring.
- Method = Ping.
- Target = 8.8.8.8 (Google DNS) and 1.1.1.1 (Cloudflare DNS).
- Failover trigger = 6 failed pings about 1 minute. (This timing depends on ping interval settings, not automatically 1 minute). This avoids false alarms during brief Starlink hiccups.
5. Decide on Failback Behavior
- Auto-failback ON: ASUS switches back to Starlink once it’s healthy. Good if your backup has data caps.
- Auto-failback OFF: stays on backup until you manually switch. Safer if Starlink is unstable because it prevents endless bouncing back and forth.
6. Save and Test Immediately
- Click Apply to save settings.
- Unplug the Starlink cable (simulate an outage).
- Within about a minute, your ASUS should flip to the backup WAN.
- Plug Starlink back in. If auto-failback is on, it should return once stable.
Testing tip: Run a video call or speedtest during the test. Watching traffic switch in real time gives you confidence it’ll work when you need it.
ASUS Failover Mistakes with Starlink (How to Avoid Them)
Relying on Physical Link Detection
ASUS defaults to “is the cable plugged in?” as its health check. Starlink almost never drops the wire, it just stalls traffic while still giving out an IP. That’s why ASUS thinks everything’s fine while your apps hang. Switch to ping detection instead. Use multiple targets (e.g., 8.8.8.8 and 1.1.1.1) so a single DNS hiccup doesn’t trigger a false failover.
Leaving Default Failover Detection
Out of the box, ASUS checks the connection too quickly and too often. That causes false alarms when a brief hiccup or high latency makes the router flip back and forth between WANs. The result: unstable internet that feels worse than the outage itself. Solution: slow down detection. A solid starting point is 10-second intervals with 6 failed pings before failover.
Ignoring DHCP Lease Timing Conflicts
This one’s subtle but critical. Starlink often hands out long DHCP leases (4+ hours), while LTE/5G backups may use short leases (1 hour). ASUS can get confused about which lease is active, leaving you stuck on backup even when Starlink is back. Symptom: failover works once, but never fails back until you manually reset the WAN. The best cure is to assign static IPs where your provider allows, or use Merlin firmware + a script that forces a DHCP renew during switchover.
Overlooking AiMesh Failover Behavior
If you run AiMesh with 20 to 40 devices, failover can trigger what looks like a total collapse. The moment Starlink drops, every node tries to reconnect to the backup WAN at once. That stampede floods the router and everything times out. The trick is staggering. Keep your main router detection fast (about 10s), but set mesh nodes to longer intervals (30 to 50s) so they reconnect in waves instead of a storm.
Forgetting Firmware Quirks
Some ASUS firmware builds carry hidden bugs when you restore old settings. On those versions, Dual WAN only works reliably after a WPS factory reset and clean manual setup. If your configuration looks correct but failover never triggers, you’re likely hitting this. The nuclear fix: reset, reconfigure from scratch, and don’t restore backup configs.
Why ASUS Router Won’t Stay Connected to Starlink
1. IP Range Wars
Most failover headaches start with addressing conflicts. Starlink hands out addresses in the 100.64.x.x CGNAT range, while the built-in Starlink router (if you use it) defaults to 192.168.1.x. ASUS, on the other hand, runs 192.168.50.x. If both devices try to act as DHCP/NAT servers, you get double NAT, and that’s what breaks VPNs, gaming, and inbound connections. The fix is simple: put Starlink in Bypass Mode so ASUS is the only router in charge.
DHCP renewal conflicts (detailed in common mistakes) can also cause routing issues.
2. Routing Table Conflicts
Even when addresses line up, Starlink sometimes leaves behind static routes or cached ARP entries. These stale routes can survive reboots and send traffic the wrong way. If your failover feels “stuck,” the quick fixes are: reboot your clients, change your ASUS LAN to a unique subnet, and, for rock-solid results, let Merlin scripts automatically flush old routes during failover.
Advanced Fixes for ASUS and Starlink Failover Problems
1. Fixing Failover That Never Triggers
If failover never triggers despite outages, verify your ping detection settings from Step 4. For maximum reliability, install Asuswrt-Merlin + WANFailover script, which can automate DHCP release/renew and handle Starlink quirks.
2. Handling Starlink Sleep Mode
Sometimes Starlink hands out an IP but stops routing traffic. ASUS won’t switch because it still sees a valid lease. To catch this, use multiple ping targets as configured in Step 4 and configure ASUS to mark the WAN down only after several consecutive failures. This prevents “sleep mode” from leaving you stranded.
This advanced ASUS RT-AX failover setup for Starlink prevents double NAT and keeps your network stable during outages.
Final Thoughts
By running Starlink in Bypass Mode, pairing it with an ASUS Dual WAN router, and tuning ping-based failover, you’ve turned random Starlink drops into a non-event. Work calls, livestreams, gaming sessions stay smooth even when Starlink blinks.
I run this exact setup on my ASUS RT-AX86U, and it quietly keeps me connected every day. Set it up once, test it, and your internet just works. No drama, no surprises.
Related Guides
Frequently Asked Questions
How much extra power does running ASUS dual WAN with Starlink actually consume?
The ASUS router adds about 15-25W continuously, plus your backup connection (LTE modem ~8-12W). Expect roughly $3-5/month in extra electricity costs. If you’re off-grid with solar, factor in ~35W total draw when calculating battery capacity.
What happens if both my Starlink AND backup connection fail at the same time?
Your ASUS will show “no internet” and stop routing traffic entirely. Devices stay connected to WiFi but get no internet. There’s no “third failover” option. Solution: Use a UPS for power outages, or consider a third WAN via USB tethering on compatible models.
Can I use my phone’s hotspot as the backup connection, and will it auto-connect?
Yes, but it requires USB tethering or a dedicated mobile router. Phone WiFi hotspots won’t work because ASUS needs a wired connection for dual WAN. Most users buy a separate LTE/5G router ($100-200) rather than tethering their phone 24/7.
Why does failover work perfectly during testing but fail during real Starlink outages?
Testing (unplugging cable) triggers immediate physical link detection. Real outages often leave the “link up” while traffic dies, requiring ping detection. Also, real outages can last 10+ minutes vs your 30-second tests, exposing DHCP lease timeout issues you don’t see in short tests.