

Getting the best Starlink dish placement in Nigeria matters more than you might think. You just unboxed your Starlink kit, or maybe you already have, expecting blazing speeds. But instead? No signal… or worse, painfully slow internet that drops every few minutes.
Here’s the thing: Starlink is not plug-and-play like a regular router. Placement is everything.
Most setup guides are built for open fields in the U.S. or the snowy rooftops of Europe. But Nigeria? That’s a whole different story. From high concrete fences and water tanks to palm trees, aluminum roofing sheets, and unpredictable storms, your environment can make or break your Starlink experience.
Table of Contents
In this Starlink installation guide in Nigeria, we’ll show you how to find the best spot for your dish placement for Nigerian homes, businesses, and weather. Let’s make sure you get the speed you paid for.
Why Placement is Everything for Starlink in Nigeria
Starlink works by connecting directly to a network of low-earth orbit satellites. For that connection to stay strong and stable, your dish needs a wide, unobstructed view of the sky at least 100 degrees across.
Unlike traditional satellite dishes that point to a fixed location, Starlink constantly adjusts to track moving satellites. That means even minor obstructions like a small palm branch, a neighbor’s water tank, or a nearby pole can interrupt your signal and cause drops or lag spikes.
In Nigeria, these challenges are everywhere. Common issues include:
- Tall palm trees swaying over rooftops
- Concrete fences and iron water tanks breaking the line of sight
- Parapet-style rooftops, often edged with railings or satellite dishes
- Two-storey buildings closely packed in urban neighborhoods
One blocked angle is enough to ruin your connection. That’s why getting Starlink dish placement right from the start is very important and we will address the challenges of Starlink internet speed issues in Nigeria.
Use the Starlink App Obstruction Tool
One of the most overlooked features in the Starlink setup process is the built-in Obstruction Tool. It’s designed to help you find the clearest view of the sky, but many users in Nigeria either skip it or use it the wrong way.
Here’s how to get the most accurate results:
Step-by-Step Guide: Using Starlink Obstruction Tool for Perfect Installation in Nigeria
- Stand exactly where you plan to mount the dish.
Not beside it. Not near it. Right on the exact spot. - Open the Starlink app and launch the obstruction scan.
- Slowly rotate your phone in a full 360° circle.
Make sure the camera is scanning both overhead and around the horizon. - Repeat the scan at different times of the day.
Sunlight, shadows, and reflections can distort your perception of open space.
Run a second scan during the wet season. Foliage density changes dramatically in Nigeria between dry and rainy months; especially with mango, neem, or palm trees nearby.
A simple obstruction now might become a serious signal blocker when the trees fill out or weather shifts. This quick double-check can save you from frustrating signal drops later on.
Starlink Dish Placement in Nigeria: Best Options for Fast Internet
You may be wondering, “Where is the best place to install my Starlink dish?”
Not every spot is created equal when it comes to mounting your Starlink dish. Getting the right elevation and exposure to the sky is key. Below are the best mounting options that work well in Nigerian environments, along with critical placements to avoid.
1. Flat Rooftop Starlink Installation for Nigerian Bungalows and Duplexes
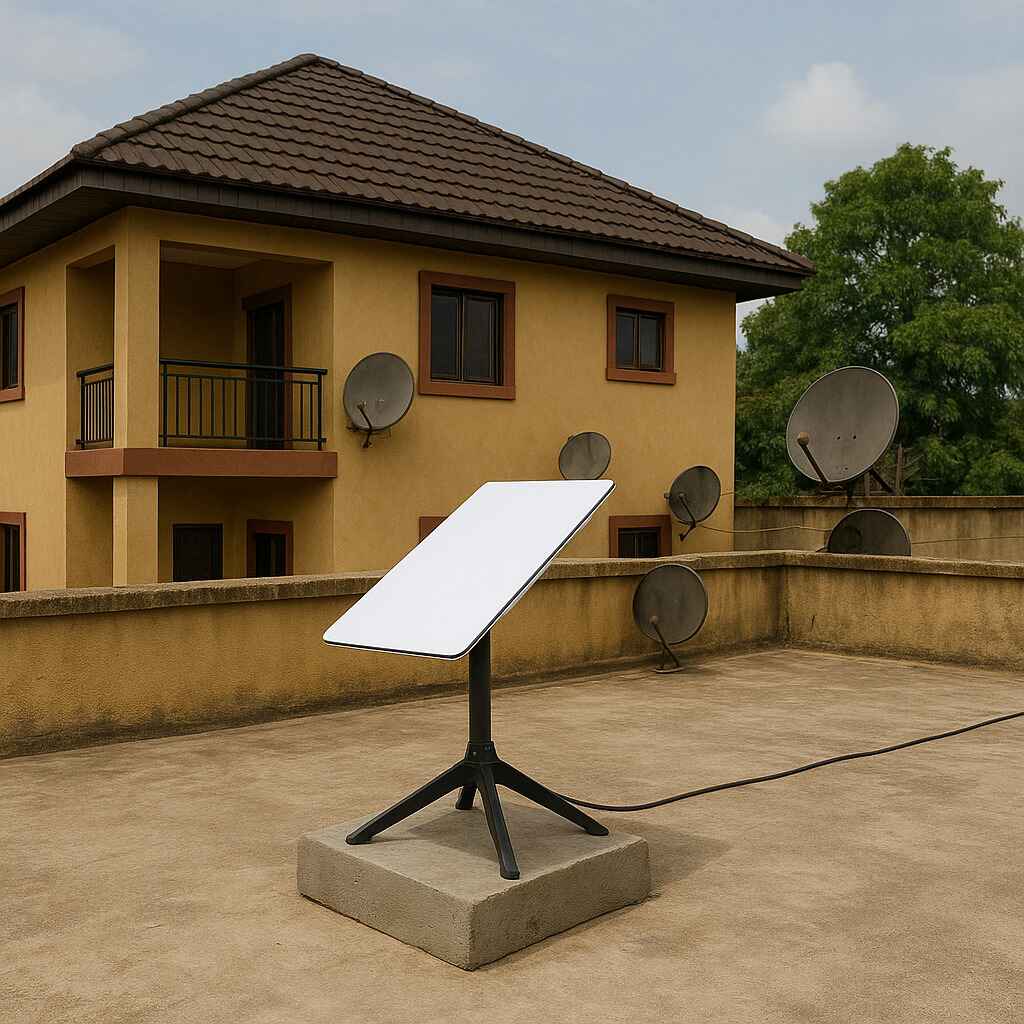
A flat rooftop is one of the most effective spots to install a satellite dish or antenna. With a wide, unobstructed view of the sky, this location often delivers superior signal strength and reliability making it ideal for single or two-storey buildings like bungalows and duplexes.
Installation tips:
- Use a heavy-duty cement block base or a custom metal mounting bracket to anchor the pole securely. This prevents movement during high winds and reduces vibration over time.
- Avoid placing the dish near metal objects such as other satellite dishes, steel railings, or overhead power lines. These can cause signal reflection or interference, degrading performance.
- If the roof has a parapet wall, position the dish at least one meter above it to maintain a clear line of sight.
Best-in-class choice for signal strength just ensure it’s securely mounted, clear of obstructions, and elevated above parapets for consistent performance.
2. Wall-Mounted Pole on Side of Building
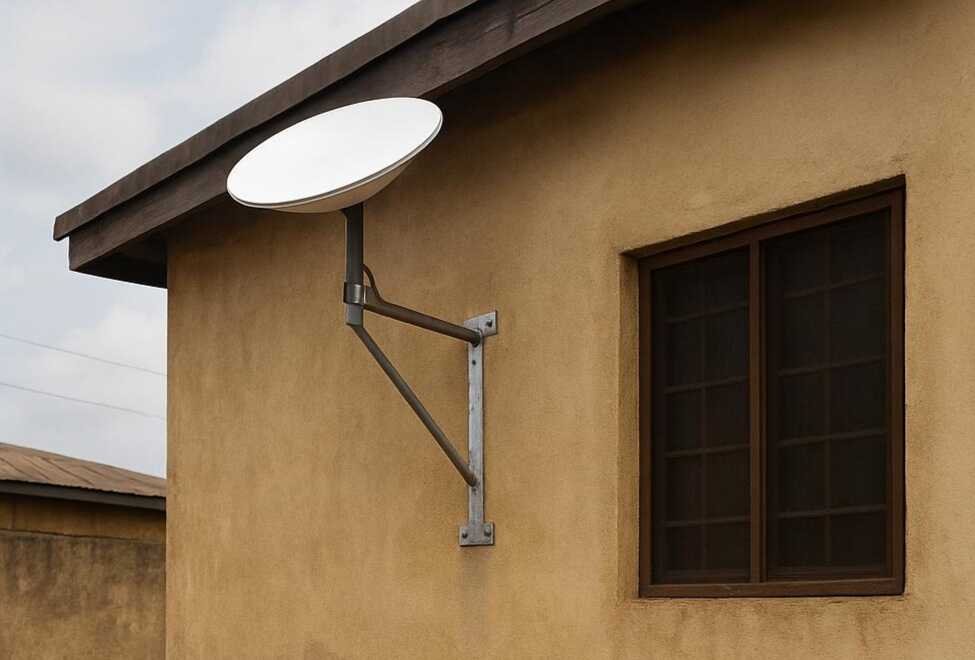
Installing Starlink with Wall-Mounted Pole on Nigerian Buildings (Safer Alternative).
If climbing onto the roof isn’t an option, installing a pole on the side of the building can be just as effective provided it’s done right. This method uses a 1.5 to 2-meter galvanized steel pole secured with a durable L-bracket or wall-mount kit designed to handle wind and weather exposure.
Key considerations:
- The top of the pole must rise above the roofline, not stop beside it. This ensures a clearer line of sight for your antenna or satellite dish, especially in dense or obstructed areas.
- Mount it on a sturdy vertical surface ideally a reinforced concrete or brick wall to minimize vibrations and shifting over time.
- Seal all anchor points properly to prevent water ingress and long-term structural damage.
A practical, safer alternative when rooftop access is tough just make sure it’s mounted high enough and firmly anchored on a solid wall for strong signal performance.
3. Ground-Level Starlink Installation in Nigeria: Using Raised Poles for Clear Signal
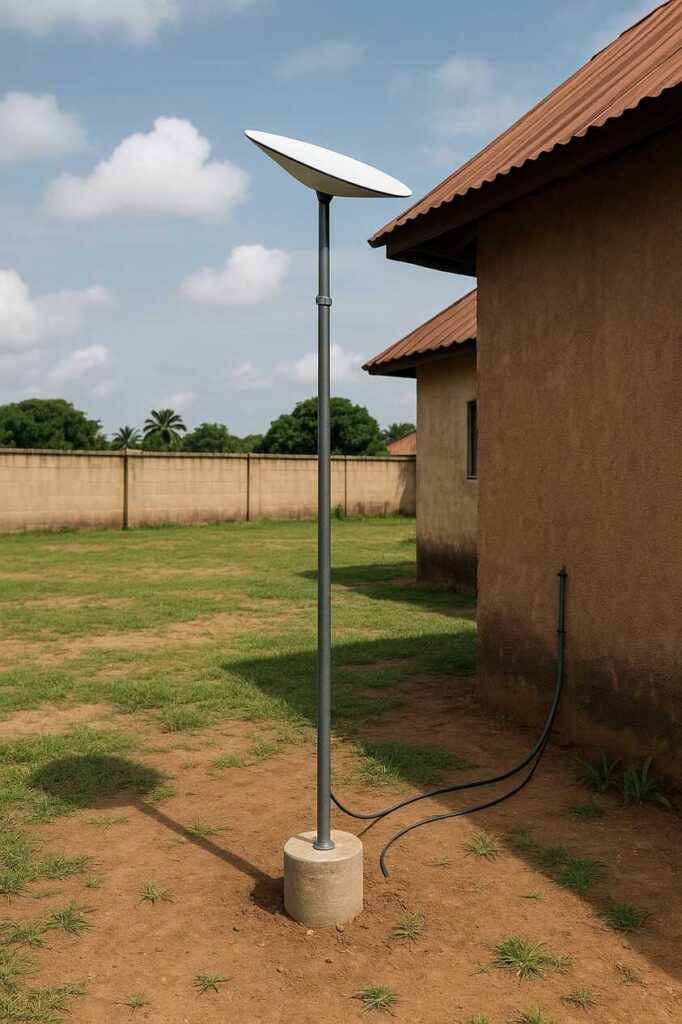
If you’re working with a clear, open space like a backyard or compound without surrounding tall buildings a ground-level installation can work surprisingly well. The key is achieving enough height to match rooftop-level line of sight.
Installation insights:
- Use a sturdy 3–4 meter pole, preferably galvanized metal or thick-walled PVC, anchored securely in a concrete base. This combination provides both height and long-term durability.
- Placement is crucial: position it where there are no trees, fences, or walls that could block the signal path throughout the day.
- Cable management matters use weather-rated conduit to protect wires running from ground to interior.
Works well in open areas with no overhead barriers, height and placement are everything, especially in compounds or rental homes.
4. Where You Should Never Install Your Starlink Dish in Nigeria
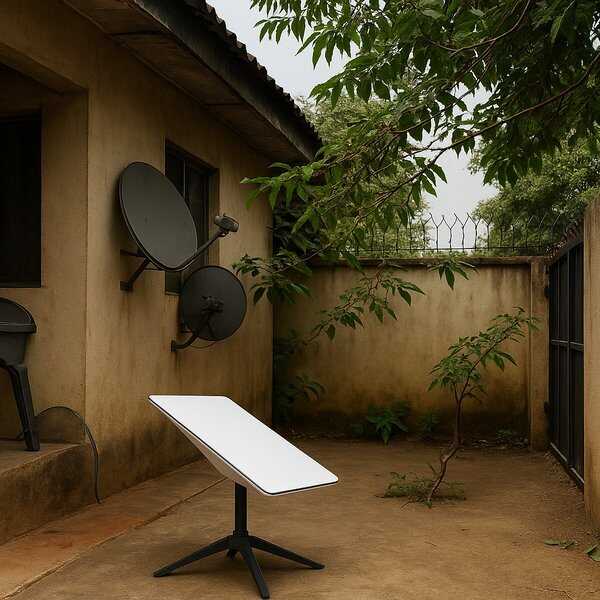
Even the most advanced satellite systems struggle when poorly placed. To get consistent high-speed internet with Starlink, it’s just as important to know where not to install the dish as it is to find the right mounting method.
Starlink common problem areas:
- Windowsills and verandas: These locations often have limited upward visibility, especially if covered or recessed. They’re also more prone to rain splashes and dust buildup, which can disrupt the dish’s auto-tracking and signal lock.
- Next to traditional satellite TV dishes: While they may seem similar, placing your Starlink dish nearby can introduce signal reflections or cross-interference, especially if the other dish is still active or misaligned.
- Under roof overhangs or close to tree branches: These block the satellite’s line of sight, not just in stormy weather but also during clear skies. Even seasonal leaf growth can interrupt your signal.
- Inside compounds with tall fences or metal spikes: These structures create signal deflections and shadows, especially if they’re made of iron or steel. The result? Drops in speed, intermittent disconnections, or total signal loss at peak hours.
Starlink thrives on open skies. Prioritize elevation and clear surroundings, and you’ll get a much smoother and more reliable connection.
For strong, stable Starlink performance in Nigerian homes, prioritize height and clear skies. Mount securely, avoid obstructions, and skip shaded or cramped spots. A well-placed dish means fast, reliable internet rain or shine.
How Nigerian Weather Affects Starlink Installation
Finding the best Starlink setup for Nigerian weather means planning for the realities of both the rainy and dry seasons. From heavy downpours to scorching sun, Nigeria’s climate can impact your Starlink dish in ways that go beyond basic installation.
How Rain and Storms Impact Your Starlink Internet Connection in Nigeria
Starlink dishes are built for outdoor use, but heavy rainfall can still disrupt connectivity, especially during Nigeria’s rainy season from April to October.
- Avoid placing the dish in low-lying areas where water tends to pool or splash.
- Slightly tilt the dish upwards to allow for natural water runoff. This reduces the chance of water sitting on the face of the dish and affecting performance.
- Ensure that nearby surfaces like parapet walls don’t channel water directly onto the dish.
Dealing with Heat and Sun: Protecting Your Starlink Dish in Nigeria’s Dry Season
During the dry season, high temperatures and direct sunlight can push your dish to its thermal limits. When the hardware gets too hot, it may shut down temporarily to protect itself.
- Don’t hide your dish under a shade to block the heat; it’ll block the sky too and reduce signal quality.
- Instead, mount it where it can “breathe”: open rooftops or standalone poles help with airflow and cooling.
- Avoid mounting it near reflective materials like aluminum roofs, which can make the heat worse.
A smart setup that handles Nigeria’s rainy and dry seasons will keep your Starlink running stronger, longer, with fewer outages and less stress.
Planning Power and Cable Routing for a Reliable Starlink Setup in Nigeria
A perfect Starlink dish location is only half the job. Power and cable routing can make or break your setup. The dish connects to the router using a long, durable white cable, but poor routing can lead to signal drops, physical damage, or unnecessary exposure to heat and rodents.
Key cable and power planning tips:
- Avoid sharp bends: Starlink’s white cable is strong but not meant to be tightly twisted or sharply bent. Smooth, gradual curves maintain signal integrity.
- Use PVC conduit: Whether your dish is on the roof or mounted on a wall, running the cable inside a PVC pipe shields it from rain, sun, and pests.
- Drill smart: When routing through walls or ceilings, seal the entry points with weather-resistant foam to block moisture and insects.
- Router location matters: Keep the Starlink router close to a power source, preferably a UPS or inverter system if you’re in an area with unstable electricity. This ensures continuous service during power outages.
Poor cable planning can lead to frustrating performance issues. Treat it as seriously as choosing the dish spot itself.
Pro Tips for Maintaining Your Starlink Internet Speed in Nigeria
Setting up your Starlink dish placement is just the start; keeping it running smoothly in Nigeria means staying proactive. Use the Starlink app to check signal history and spot issues like regular signal drops or obstructions. If problems come from one direction (like a south-facing wall or tree), try a slight tilt adjustment to the dish to improve the Starlink signal.
In lightning-prone areas, a surge protector between your router and power source is a must to avoid damage. And if your signal feels weak in certain parts of the house, especially through thick walls or over long distances, a mesh Wi-Fi system will help spread coverage evenly across your space.
Small tweaks like these can significantly boost long-term reliability, especially in locations with dense infrastructure or erratic weather.
Hire a Starlink Installer in Nigeria: Why It’s Worth It
If you’re not comfortable with heights, tools, or handling electrical work, hiring a local Starlink installer in Nigeria is a smart move. Many active communities, such as Facebook groups, Telegram channels, and WhatsApp forums, share contacts of trusted professionals. Some resellers and online electronics shops even offer paid installation as part of the kit delivery.
Why go pro? You get secure mounting with the right tools, precise alignment to avoid hidden obstructions, and safe cable routing that protects your property. While DIY is possible, a skilled installer can save you time, effort, and headaches, unlocking Starlink’s best performance from the start.
Frequently Asked Questions (FAQ)
Can the Starlink dish be moved after setup?
Yes. You can relocate the dish, but give it a few minutes to recalibrate once powered on at the new position. It will automatically realign with the satellites.
Can I install Starlink on a carport?
Only if it’s the highest and most stable point. Carports are often convenient, but they must offer an unobstructed sky view and be strong enough to handle wind and rain.
How tall should the Starlink pole be?
At least 2 meters above any nearby obstruction. This ensures the dish gets a clean line of sight and minimizes signal drops from walls, tanks, or trees.
Conclusion
Smart placement makes all the difference When it comes to getting the most out of your Starlink setup, where you mount the dish matters more than anything else. A clear view of the sky, a safe and stable mounting method, and a clean cable route are the three pillars of a reliable connection.
In fact, placement accounts for nearly 80% of your Starlink experience, from speed consistency to uptime.
Before settling on a final spot:
- Test multiple positions around your property using the Starlink app’s obstruction checker.
- Take note of signal stability during different times of day.
- Check for nearby objects that could become seasonal obstructions, like growing trees or temporary scaffolding.
If you get your Starlink dish placement in Nigeria right from the start, you’ll enjoy faster, more reliable internet throughout.
2 Comments
Pingback: Is Starlink Still Portable in Nigeria? What You Need to Know |
Pingback: Why Is Starlink Slow? 7 Easy Fixes That Actually Work |