

This is the Starlink router settings – configure reset and troubleshoot guide you’ve been looking for. We’ll go straight into how to actually get inside your Starlink router and manage it without the guesswork. You’ll see why certain options vanish, the real fixes that work, and the clever tweaks power users rely on. From Wi-Fi setup and security settings to bypass mode, CGNAT headaches, and spotting the difference between a settings mess and actual hardware failure.
When we’re done, you won’t just know which buttons to click. You’ll get why Starlink acts so weird compared to other internet setups and how to bend it to do exactly what you need.
Table of Contents
How to Access Starlink Router Settings (The Right Way)
Why There’s No Starlink Router Web Interface (No 192.168.1.1)
If you’ve used Netgear, TP-Link, or Ubiquiti routers, you’re probably used to typing an IP address like 192.168.1.1 into a browser to get hundreds of settings. Starlink made a completely different choice: their router has no web interface at all.
This wasn’t an oversight. It was pure design philosophy. Traditional routers throw 200+ options at you, but most households only touch about five of them: Wi-Fi name, password, maybe a guest network. Those other 195 options? They’re a support nightmare because it’s ridiculously easy for someone to accidentally kill their internet connection. By ditching the browser portal entirely, Starlink:
- Wiped out the biggest source of router support calls (people breaking stuff they don’t understand).
- Streamlined the firmware since there’s no web server eating up resources, which means cleaner code, fewer bugs, and way fewer openings for hackers to exploit.
- Made everything consistent across all their hardware versions, since every Starlink router gets controlled the exact same way: through the app.
The downside hits you right in the face: power users lose VLANs, port forwarding, and custom firewall rules. But for the 80% of Starlink customers who just want Wi-Fi that actually works, it’s basically impossible to mess anything up.
Step-by-Step: The Correct Way to Access Your Starlink Router With the App
- Install the Starlink app
- iPhone/iPad: App Store → Starlink (requires iOS 15.1 or later).
- Android: Google Play → Starlink (works on Android 9+).
- Connect to the Starlink Wi-Fi first
- Open your phone’s Wi-Fi settings.
- Join the network named STARLINK (or whatever you renamed it).
- On a brand-new setup, the network is open until you create a password.
- Open the app
- Go to Settings → Router (sometimes listed as Settings → Networks in older app versions).
- From here you can rename the SSID, change your Wi-Fi password, and access content filtering or bypass mode.
Expected outcome: The app should display your router status and let you edit network details. If not, move to troubleshooting.
Starlink App Not Connecting to Router (Troubleshooting Fixes)
Problem 1: The app says “Offline,” but your internet works.
- Why it happens: Phones often fall back to cellular data if Wi-Fi appears to have no internet (common during boot or maintenance). On Android this is called Smart Network Switch, and iOS has a similar fallback.
- Fix: Force your phone to stay on Starlink Wi-Fi (turn off cellular data temporarily). Force-quit and reopen the app.
Problem 2: The app loads, but settings don’t appear.
- Why it happens: The router may still be booting. During startup, the LED is on but the router hasn’t finished its handshake with the dish, so management isn’t ready yet.
- Fix: Wait 2 to 3 minutes after powering on. If it still fails, reboot both your phone and the router, then try again.
Problem 3: The app shows no options, or your SSID isn’t visible.
- Why it happens: The router is in Bypass Mode. On Gen 3, the front LED glows violet when bypass is active. In this mode, the Starlink app cannot manage settings.
- Fix: To exit bypass, factory reset the router (Gen 3 has a pinhole reset button, Gen 2 requires six quick power cycles). After reset, reconnect to STARLINK and reconfigure.
When it’s a bigger problem:
- If your app never connects and the router’s LED never lights, you may have a hardware fault (common with bad power supplies).
- If the SSID doesn’t broadcast at all after reset, the router board itself may be defective. In these cases, contact Starlink support.
Quickly Identify Your Starlink Router Generation (Gen 2 vs. Gen 3)
Starlink has three router generations with different reset methods and features:
| Generation | Physical Design | Key Features | Reset Method |
| Gen 1 | Rectangular, prism-like, single Ethernet port | No mesh support, limited app interface | Physical replacement only |
| Gen 2 | Tall glass-front tower, light on base | App configuration, mesh support | Six rapid power cycles |
| Gen 3 | Flat wide body, multiple Ethernet ports, front LED | Bypass mode (violet LED), pinhole reset, improved mesh | Hold pinhole button approximately 15 seconds |
Quick ID: Tall and upright = Gen 1/2. Flat and wide with extra ports = Gen 3.
Why it matters: Some features (bypass mode, multiple LAN ports) only exist on Gen 3, and using the wrong reset method won’t work.
Wi-Fi Configuration: How to Change Your Starlink Wi-Fi Name & Password
Starlink Account Login vs. Wi-Fi Password (Key Difference)
Here’s where most people trip up: your Starlink account password and your Wi-Fi password are two totally different things:
- Account password: This gets you into billing, plan changes, and support tickets at starlink.com.
- Wi-Fi password: You set this in the Starlink app, and it’s what your phone, laptop, and every other device needs to hop onto your home network.
These passwords live in completely separate worlds. Changing one won’t budge the other. So if your phone keeps bouncing off your Wi-Fi, don’t waste time fiddling with your billing password.
Changing Wi-Fi Name and Password on Starlink
Out of the box, your router shouts STARLINK to the world. Keep it that way and you’ll run into trouble if your neighbors also got dishes on their roofs. Pick something unique but don’t broadcast your life story (skip names like “SmithFamilyWiFi”).
- Open the Starlink app → Settings → Router → WiFi Configuration.
- Type in a new SSID (Wi-Fi name).
- Create a bulletproof password (WPA3, at least 8 characters, throw in letters and numbers).
Strong passwords matter way more with Starlink because your satellite beam covers serious ground. Weak passwords invite trouble from freeloaders who can leech your connection from distances that would make regular internet providers weep. Satellite coverage stretches way past typical WiFi range.
Should You Split Your Starlink 2.4 GHz and 5 GHz Wi-Fi Bands?
Starlink smooshes both bands into one network name, letting your devices pick whichever works best.
- Split when you have to: Older smart home gadgets (thermostats, smart plugs, ancient printers) throw tantrums and only play nice with 2.4 GHz. Give them their own dedicated network and watch the magic happen.
- Leave it combined if possible: New laptops and phones actually prefer the combined setup and switch bands like pros.
Here’s the real deal: Nest thermostats and tons of smart bulbs will flat-out refuse to connect unless you create a 2.4 GHz-only network just for them.
Starlink Hidden SSID: Should You Use It?
The “Hide SSID” button makes your network name vanish from everyone’s Wi-Fi list. So it’s best to use it after you have connected all the devices you want to connect to Starlink
- Reality check: This won’t fool actual hackers since free apps can spot hidden networks in seconds.
- Actually useful for: Keeping nosy neighbors from seeing your network name, or cleaning up the Wi-Fi mess in crowded apartment buildings.
- Why Starlink bothers: People kept asking for it, even though it’s mostly security theater.
How to Factory Reset Your Starlink Wi-Fi Password (If You’re Locked Out)
- To peek at your password: App → Settings → Router → WiFi Configuration → View password.
- Locked yourself out completely: You’re looking at a factory reset. There’s no secret backdoor, and that’s on purpose.
Factory reset walkthrough:
- Gen 2: Yank the power cord and plug it back in six times, fast.
- Gen 3: Jam something into the reset hole for 15 seconds until the LED starts flashing white.
- What gets wiped: Wi-Fi name, password, DNS settings, content filters.
- What survives: Your account details, billing info, dish setup.
Bottom line: You now know exactly how to wrangle Wi-Fi passwords, when to split your networks, and how to dig yourself out when you get locked out without spinning your wheels on the wrong fixes.
Security Features & User Control Workarounds
Why fewer knobs. Starlink keeps the router simple to dodge “self-inflicted outages.” The app only shows the controls most homes actually need. Anything that generates angry support calls (ACLs, port-forwarding, MAC allow/deny lists) gets the boot. All your configuration happens in the Starlink app, not some web portal.
What’s missing vs. what you do get (Aug 2025).
- No MAC filtering. No port forwarding. Need these features? Grab a third-party router and flip Bypass Mode on.
- Content filtering: Built right in, runs on DNS blocking (Malware-only or Malware+Adult). It switches your DNS to Cloudflare for Families which is lightweight since there’s no packet inspection happening. You’ll hit some false positives and stuff that slips through. Toggle it in App → Router → Content Filtering.
- Guest Wi-Fi: Actually works now (they added this in recent updates, but tons of people still don’t know because old guides said it wasn’t there). Set it up in Settings → Add Network → toggle “Guest Network.” Guests can’t mess with the Starlink app settings.
- Per-device control: Client Pausing lets you kill internet for specific devices temporarily. It’s not a permanent blocklist and it’s definitely not MAC filtering. Hunt down devices in the app and Pause/Unpause them when needed.
Kick unknown users off fast. Spot devices you don’t recognize and need to slam the door immediately? Change the Wi-Fi password. The router boots every device off the network, forcing everyone to type in new credentials. Only people who get the new password from you can get back on. Path: Settings → Router Configuration → select your Wi-Fi → change password → Save. Every device (yours included) will drop and ask for the fresh password.
DNS Filtering for Parental Controls: Is It Enough?
- Pick Malware+Adult if kids are in the house. It’s lightweight and covers your whole network.
- Know what it can’t do: DNS filters can’t set time schedules, can’t block specific apps, and won’t peek inside HTTPS traffic. Think of them as a basic safety net, not some hardcore parental control system.
- Want detailed rules (per-user schedules, app blocking)? You’re looking at a third-party router or running something like Pi-hole behind Starlink in Bypass Mode. Just know you’re trading simplicity for way more complexity and troubleshooting headaches.
Advanced Starlink Networking: Bypass Mode, Port Forwarding & CGNAT
Why Port Forwarding Doesn’t Work on Starlink (CGNAT Explained)
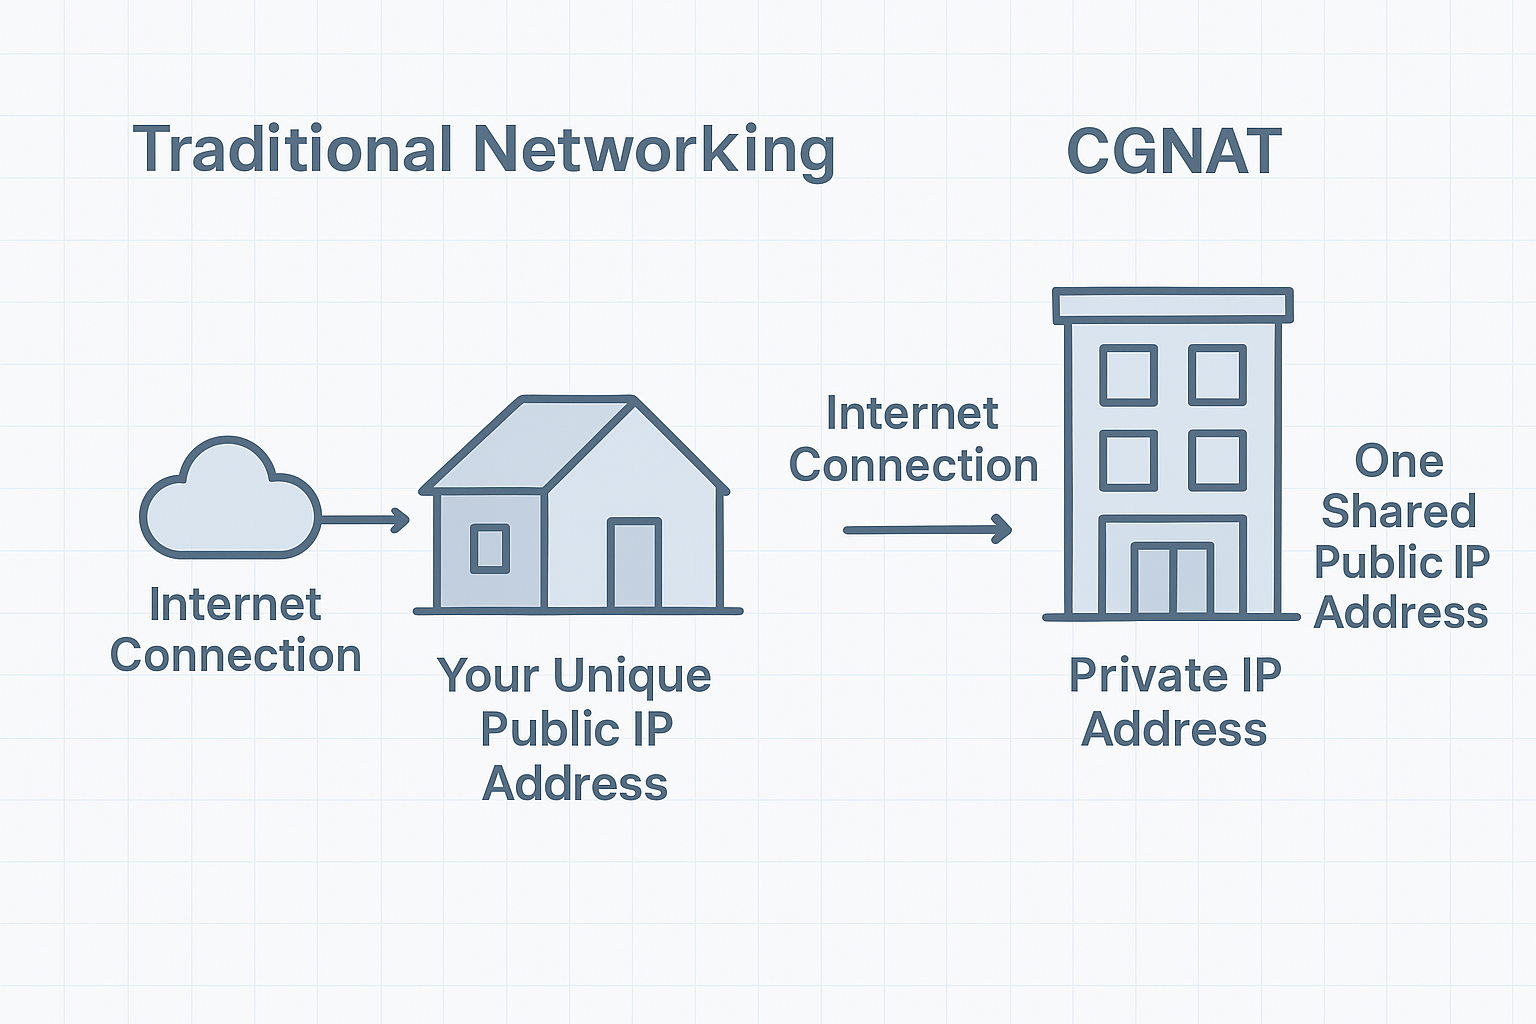
Starlink uses CGNAT (Carrier-Grade NAT), which means multiple customers get crammed behind the same public IPv4 address. This saves precious IPv4 addresses and makes global management easier, but it completely kills inbound connections. You can’t run a home web server, host your own email, or peek at your security cameras from work. Picture it like living in a massive apartment complex where everyone shares one street address. Without your own unique address, packages (inbound traffic) have no way to find your specific door.
How to Check if You’re Behind CGNAT on Starlink
- Open the Starlink app → Advanced → Router IP. Write down the WAN address (usually looks like 100.x.x.x if you’re stuck in CGNAT).
- Visit whatismyip.com on the same network.
- Compare the two addresses:
- If they match (or are really close): You scored a public IP.
- If Starlink shows 100.x.x.x but the website shows something totally different: You’re trapped behind CGNAT.
- Pro tip: Business and Priority plans have better odds of getting a real public IP, but nothing’s guaranteed.
Starlink Remote Access Workarounds (VPN, ZeroTier, Tailscale)
- VPN Mesh Services:
- Tailscale: Dead simple option that builds a private “virtual network” connecting all your devices. Free for small home setups.
- ZeroTier: Similar concept, more bells and whistles for connecting multiple locations.
- Commercial VPNs with Port Forwarding: Some providers (Mullvad, ProtonVPN) let you punch holes through their servers.
- Cloud Relay Services:
- Plex: Streams your movie collection without needing any open ports.
- Nextcloud with hosted relay: Keeps your files synced securely.
- TeamViewer / AnyDesk: Remote desktop access that completely sidesteps the port forwarding mess.
Ethernet Adapter Problems.
Starlink’s Ethernet adapter ($25) is mandatory for hooking up third-party routers. Common headaches include:
- Random disconnects: Usually heat buildup or sketchy power delivery. Make sure everything’s plugged in tight and don’t torture the cable with sharp bends.
- Devices can’t grab IP addresses: Your third-party router might be stepping on Starlink’s 192.168.100.x turf. Switch your router’s network to 192.168.1.x to stop the conflict.
- Nothing works right: Nuclear option time. Factory reset both the adapter and your router, then start fresh.
Static IPs for Local Devices.
Need rock-solid addresses for your NAS, security cameras, or smart home hub?
- Stick with Starlink’s default range (192.168.100.0/24).
- Example setup:
- IP: 192.168.100.50 (stay away from 1 through 10)
- Subnet: 255.255.255.0
- Gateway: 192.168.100.1
- DNS: 8.8.8.8 or just use Starlink’s built-in DNS.
Bypass Mode + 3rd-Party Router: The Real Fix.
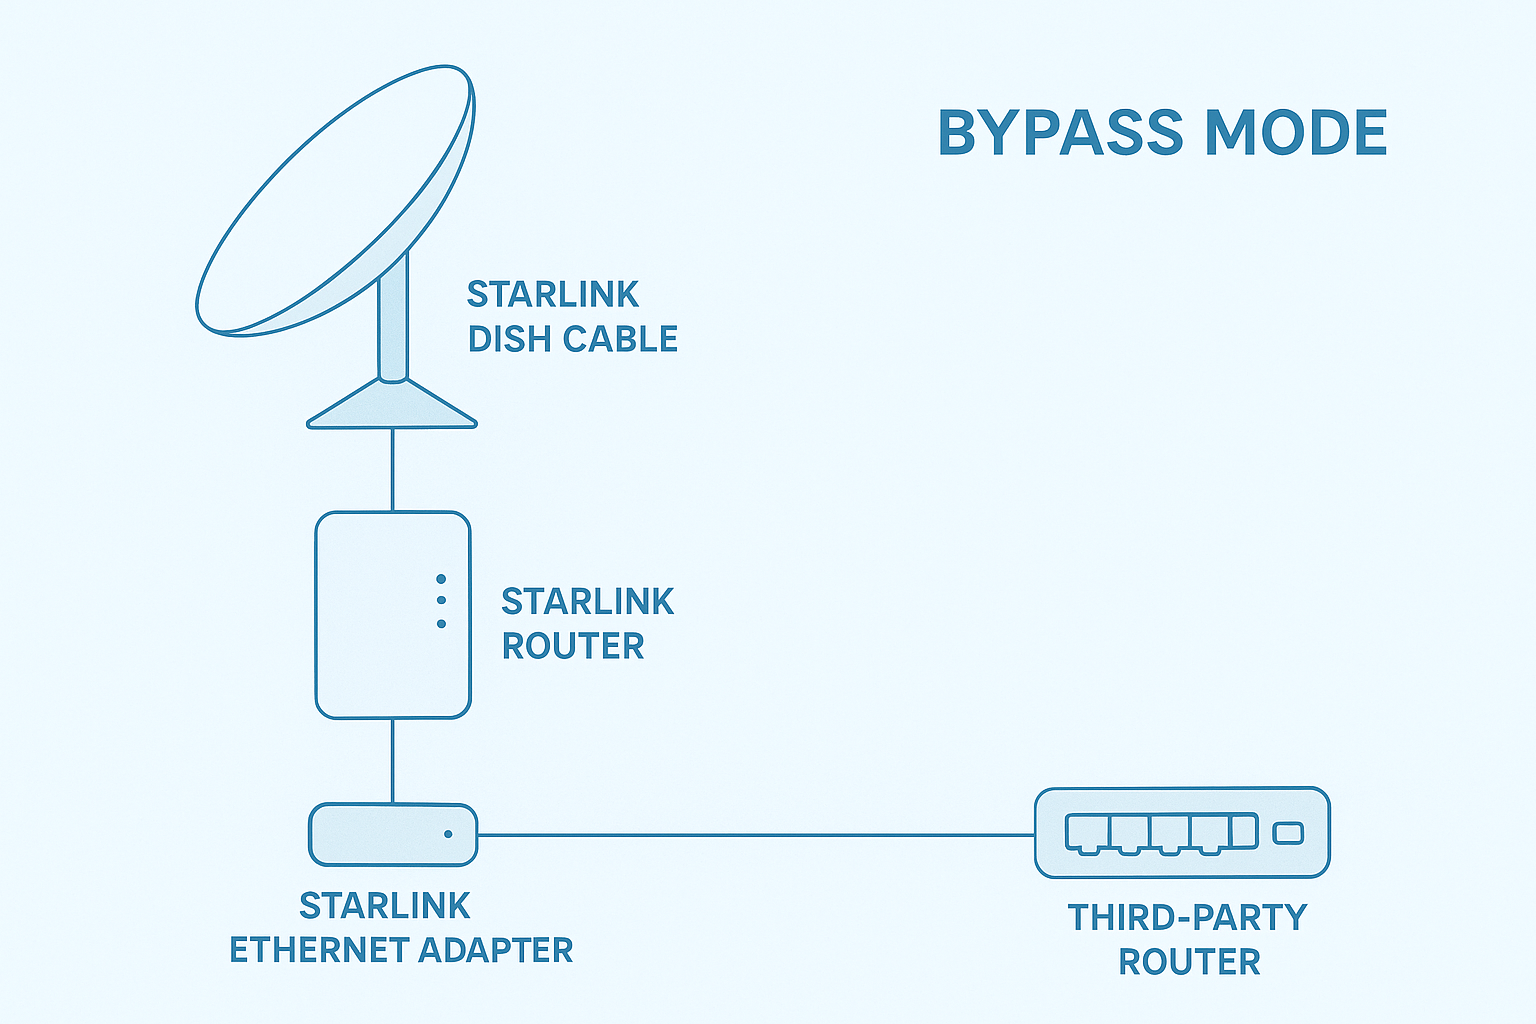
Want total networking control? Flip on Bypass Mode and plug in a proper router (UniFi, Mikrotik, Asus, whatever you prefer) through the Ethernet adapter.
- Why this matters: Kills the double NAT nightmare and brings back all the advanced features (port forwarding, VLANs, QoS).
- Setup process: Plug in adapter → fire up your third-party router → switch Starlink app to Bypass Mode.
- Warning: Once you go Bypass, the app loses all control. Want to go back? Factory reset is your only escape route.
Bottom line: Starlink’s CGNAT slams the door on traditional server hosting. Your only real options are VPN mesh networks, cloud relay services, or ditching the Starlink router completely with Bypass Mode.
If you want to skip Starlink’s router entirely and just run your own setup, you’ll need bypass mode. I cover the basics here, but if you want the full walkthrough (step-by-step wiring, settings, and real examples), check out this Ultimate Guide: Use Your Own Router with Starlink.
Conclusion
Don’t swap out hardware just because you can. First lock down the exact problem you’re trying to solve, then go with the simplest fix that works. For most people, the built-in Starlink router is enough. For power users, it’s just the first step before moving on to something stronger.
This Starlink router settings – configure, reset and troubleshoot guide gave you the key fixes and setup tricks. Still stuck? Drop the issue you’re facing. We look forward to helping everyone figure out smarter ways to make it work.
Want true internet resilience? Check out The Ultimate EdgeRouter X Guide for Starlink & LTE Failover. It walks you through how to set up automatic LTE backup so your connection smoothly switches over when Starlink stumbles.
Does resetting the Starlink router also reset the dish?
No. A router reset only clears Wi-Fi settings, DNS, and filters. Your dish, service, and account stay linked. If the dish itself needs a reboot, use the app or power-cycle the whole system.
What does a blinking white or amber light on my Starlink router mean?
On the Gen 3 router, a blinking white light means it’s starting up or trying to connect; solid white means it’s online. Violet indicates Bypass Mode, and red means there’s a connection problem.
On the Gen 2 router, the base light only shows power; it doesn’t indicate connection status. The app gives the real status.
Note: Starlink does not officially use “amber” as a status color.
Can I turn off or schedule Wi-Fi on the Starlink router at night?
You can only toggle Wi-Fi manually in the app. For scheduling, put the router in Bypass Mode and use your own router with Wi-Fi timers.
Why is my Starlink router not showing the 5 GHz Wi-Fi band?
Starlink merges 2.4 GHz and 5 GHz under one Wi-Fi name, so 5 GHz won’t appear separately. This is normal and helps devices switch automatically.