
")
March 15th, 2024, 9:47 AM: I’m presenting Q1 results to our $50K client when my screen freezes. Starlink died. What looked like light snow had created a ‘pocket’ on my dish that took 31 minutes to melt off. I lost the client that day.
That $3,000 mistake taught me something every rural worker learns the hard way: Starlink isn’t backup internet. It IS your internet that needs backup. After 8 months of testing every failover combination, I lost two projects during that, and burned through $300 in cellular overages, I built a system that survived 47 outages without dropping a single Zoom call. And I will teach you how to stop Starlink from killing your remote work income.
For those of us with no ISP available, “just use Starlink” isn’t a solution. It’s a gamble. That’s why I built a true Starlink failover setup with cellular backup, dual WAN routing, and monitoring that actually works when the dish decides not to.
In this guide, you’ll learn exactly what I wish someone had told me from day one:
- How to setup Starlink with backup internet the right way.
- Why a UPS is just as important as your router in a rural setup.
- EdgeRouter, Peplink, and ASUS RT-AX86U configurations that make failover seamless.
- How it really feels when the connection flips over, second by second.
- The hidden costs nobody warns you about until you’ve already signed a cellular plan.
Starlink transformed rural internet. But if you want reliability for remote work, you need a backup. Let’s build it.
Table of Contents
Why Everyone Gets Starlink Backup Wrong (And The $300 Lesson That Fixed It)
Every guide tells you the same thing: ‘Use LTE as backup.’ I did that for 3 months. Then I discovered they’re backwards.
The Conventional Wisdom:
- Starlink primary (fast but unreliable)
- LTE backup (slow but stable)
What Actually Works: During peak hours (6-10 PM), Starlink gets congested. Latency jumps from 45ms to 180ms. Voice calls sound robotic, broken. Here’s what I measured over 30 days:
Time Period Starlink Latency LTE Latency Winner 6 AM – 12 PM 45ms 65ms Starlink 12 PM – 6 PM 52ms 68ms Starlink 6 PM – 10 PM 180ms 72ms LTE 10 PM – 6 AM 48ms 70ms Starlink
The Game Changer: Use time-based routing. LTE primary during evening hours, Starlink handles the rest. Your router can switch automatically based on a schedule, not just failures.
The $300 Mistake: Month 1, I thought 50GB backup was plenty. One weekend storm hit, i burned 47GB in 3-4 days. Overage charges were brutal. Here’s the usage pattern that taught me why ‘unlimited’ plans aren’t unlimited:
What Burned Through 47GB in 72 Hours:
- Day 1: Normal backup usage (2.1GB from video calls, email)
- Day 2: Starlink down all day (18.3GB from Netflix, work uploads, cloud sync)
- Day 3-4: Still down plus weekend streaming (26.6GB from 4K movies, kids’ tablets)
The “Unlimited” Lie: After 50GB, T-Mobile throttled me to 0.5 Mbps. Technically unlimited, practically useless. The fine print revealed:
- 50GB high-speed, then “3G speeds” (0.5 Mbps)
- Video streams limited to 480p after threshold
- Hotspot data separate from phone data limits
What Actually Works – The Reverse Setup: Instead of Starlink primary/LTE backup, I now run time-based switching: 6 AM – 6 PM: Starlink primary (work hours, stable performance) 6 PM – 10 PM: LTE primary (peak congestion hours, better latency) 10 PM – 6 AM: Starlink primary (off-peak, unlimited usage)
This cuts my backup data usage by 60% while improving call quality during peak hours.
The Game-Changing Discovery: Rural Starlink gets deprioritized during peak hours just like cellular. As shown earlier, Starlink latency can spike past 180ms in the evenings, while LTE stays more stable. That’s exactly why time-based routing matters.
Real-World Impact: Before time-based routing: $78/month average LTE bills. After time-based routing: $52/month average LTE bills. Side benefit: Better call quality during evening client calls
The Counter-Intuitive Truth: Your ‘backup’ internet might actually be better than your primary during certain hours. Test both connections at different times of day before assuming Starlink should always be primary.
How to Test Starlink Failover Router Setup (5-Minute Reliability Check)
Another lesson I learned the hard way. My “bulletproof” Starlink failover setup failed during the most important client call of the year. Dual WANs, fancy router, backup LTE… everything looked perfect in the dashboard until it wasn’t.
That’s when I realized:
A true failover isn’t about switching connections. It’s about staying online without noticing the switch.
Most people assume they’re protected because they see two active WANs. But if you’ve never tested it, you’re flying blind.
The 5-Minute Starlink Failover Test
I test this setup every month now. It’s saved me from disasters more times than I can count:
Step 1: Start a live ping test. Open a command prompt and run: ping google.com. This sends continuous requests so you can see exactly when your connection breaks and recovers.
Step 2: Pull the plug. Unplug Starlink’s Ethernet cable while the ping is running. This simulates the most common failure: dish issues, power drops, or Starlink going offline.
Step 3: Watch the timestamps
- Good failover: 10-20 seconds of timeouts, then backup LTE kicks in.
- Bad failover: 60+ seconds of dead connection, or no recovery without manual fixes.
Step 4: Plug Starlink back in. Measure how long it takes to return automatically. A solid setup fails back within 2-3 minutes without restarting apps, routers, or VPNs.
Real-World Testing Results
On my EdgeRouter X, I consistently see 3-4 lost pings and a 12-18 second failover. That’s fast enough to keep Zoom calls and VPN sessions alive without manual intervention.
The Hidden DNS Trap That Breaks Starlink Failover (And How to Fix It)
Even if your router switches to LTE perfectly, your devices may still try to resolve domains using Starlink’s DNS servers. The packets flow, but DNS fails, making you “online” but unusable.
The fix is simple but critical:
- Configure your router to handle DNS locally.
- Forward all queries to public servers like Cloudflare (1.1.1.1) or Google DNS (8.8.8.8).
This ensures DNS automatically follows your backup path when Starlink dies.
Pro Tip: Carrier NAT Can Break VPN Failover
Here’s what most people miss: Some LTE and 5G providers put you behind carrier-grade NAT (CGNAT).
That means your LTE backup doesn’t have a public IP, and when Starlink fails, certain VPNs silently break even though your router shows the backup is “working.”
How to check and fix it:
- Run whatismyip.com on your LTE backup.
- If the IP shown doesn’t match the WAN IP in your router, you’re behind CGNAT.
- Call your carrier and request a public IPv4 or static IP.
Without this fix, VPN-based remote work, VoIP apps, and secure tunnels can fail even on a perfect failover and best router
What is the best type of internet to use as a Starlink backup?
Once you understand what true failover means, the next question is: What’s my backup? In rural areas, the options vary wildly, and what works for one neighbor might fail completely for another.
Here are the main types of backup connections rural Starlink users actually test:
- LTE/5G modem is still the most common option. With a dedicated modem (like the Netgear LM1200), you get stable LTE that your failover router can monitor. In wide-open farm country, Band 71 (600 MHz) often outperforms everything else because it was designed for long-range rural coverage.
- Hotspot SIM in a router. Many users slide a T-Mobile or Verizon SIM into a Pepwave/Cradlepoint router. But there’s a catch: “After 50 GB, I noticed tethering speeds drop below 1 Mbps, even though the app showed 70 Mbps,”
- Fixed wireless or WISP Local providers sometimes beam internet from a nearby tower. Latency can be higher than LTE, but it’s often unlimited data, which makes it valuable as a backup.
- Old DSL / legacy copper Slower, yes, but extremely stable if still available. For some rural households, a 10 Mbps DSL line makes the perfect “safety net.”
Some network professionals prefer cellular primary with Starlink backup for video calls, since LTE often has more consistent latency than satellite.
Bottom line: don’t pick based on what looks cheapest on paper. Pick based on what actually works at your location. Test carriers, run speed checks, and confirm reliability before you lock in your failover setup.
What router works best with Starlink and a backup internet in Rural Area?
After months of testing in harsh rural conditions, I discovered something most router reviews miss: Starlink failover isn’t about specs. It’s about surviving chaos.
Every router claims to handle dual-WAN failover perfectly, but few are built for satellite internet’s unpredictable behavior: latency spikes, dish heating cycles, firmware pushes, and rural power flickers. I spent six months testing four popular routers through 47 real Starlink outages, 153 deliberate failover drills, and extreme Montana weather. Here’s what actually worked when it mattered most.
Real-World Failover Testing Insights
🏆 EdgeRouter X ($98) Best value for rural Starlink Fast, stable, and surprisingly resilient. Average failover time: 12 seconds. Survived heat up to 95°F, recovered perfectly after power flickers, and handled Starlink’s latency spikes better than routers six times its price.
⚡ Peplink Balance 20X ($440) Enterprise-grade, but overkill for most homes Blazing-fast failover (8 seconds) and flawless stability, but its cost outweighs the performance gain unless you run critical VPNs or multiple remote workers.
🔥 ASUS RT-AX86U ($250) Best balance of power and usability. Consistent failover at 18 seconds, reliable Wi-Fi performance, and easy setup for dual WAN. Perfect if you want smooth video calls without deep network tweaking. Hers is how to configure it?
⚠️ MikroTik hEX S ($79) Looks good on paper, struggles in practice Frequent heat-related shutdowns, manual restarts after power drops, and slow failover (25-38 seconds). Fine for controlled environments, but unreliable in rural chaos.
Why Routers Behave Differently on Starlink
Most guides assume you’re on fiber or cable, where latency is predictable. Starlink behaves differently on other routers: spikes, handoffs, and weather swings, so router health checks need to be tuned with that in mind.
The Overlooked Heat & Power Problem
In rural setups, routers often sit in attics, barns, or utility rooms without climate control. I logged 72 hours of downtime before realizing my MikroTik was thermal-shutting at 89°F.
Quick fix: A cheap $12 USB fan lowered internal temps by 15°F and eliminated heat-induced reboots.
Power is another hidden culprit: rural grids flicker weekly and surge during storms. Choose routers with clean power recovery. EdgeRouter and ASUS excelled here, while MikroTik stumbled.
For rural Starlink failover, reliability beats features:
- Best value: EdgeRouter X
- Best balance: ASUS RT-AX86U
- Best performance: Peplink Balance 20X (if budget allows)
If you pick a router that can handle heat, power flickers, and Starlink’s latency spikes, you’ll stay connected while others scramble.
Step-by-step guide to setting up Starlink and LTE failover
Once your LTE modem is online, the real work begins: setting up a smart failover so Starlink stays primary and LTE only activates when needed. I’m using an EdgeRouter X here, but the same principles apply to Peplink, MikroTik, or ASUS dual-WAN routers.
Why Starlink Needs Special Settings
Most guides suggest 5-second health checks. That works for fiber but fails on Starlink.
- Starlink’s satellite handoffs regularly cause 8-12 second pauses.
- If your router declares Starlink “dead” too quickly, you’ll get false failovers, chewing through LTE data unnecessarily.
- The sweet spot: slightly slower checks plus smarter targets.
Optimized EdgeRouter X Configuration (Starlink Primary, LTE Backup)
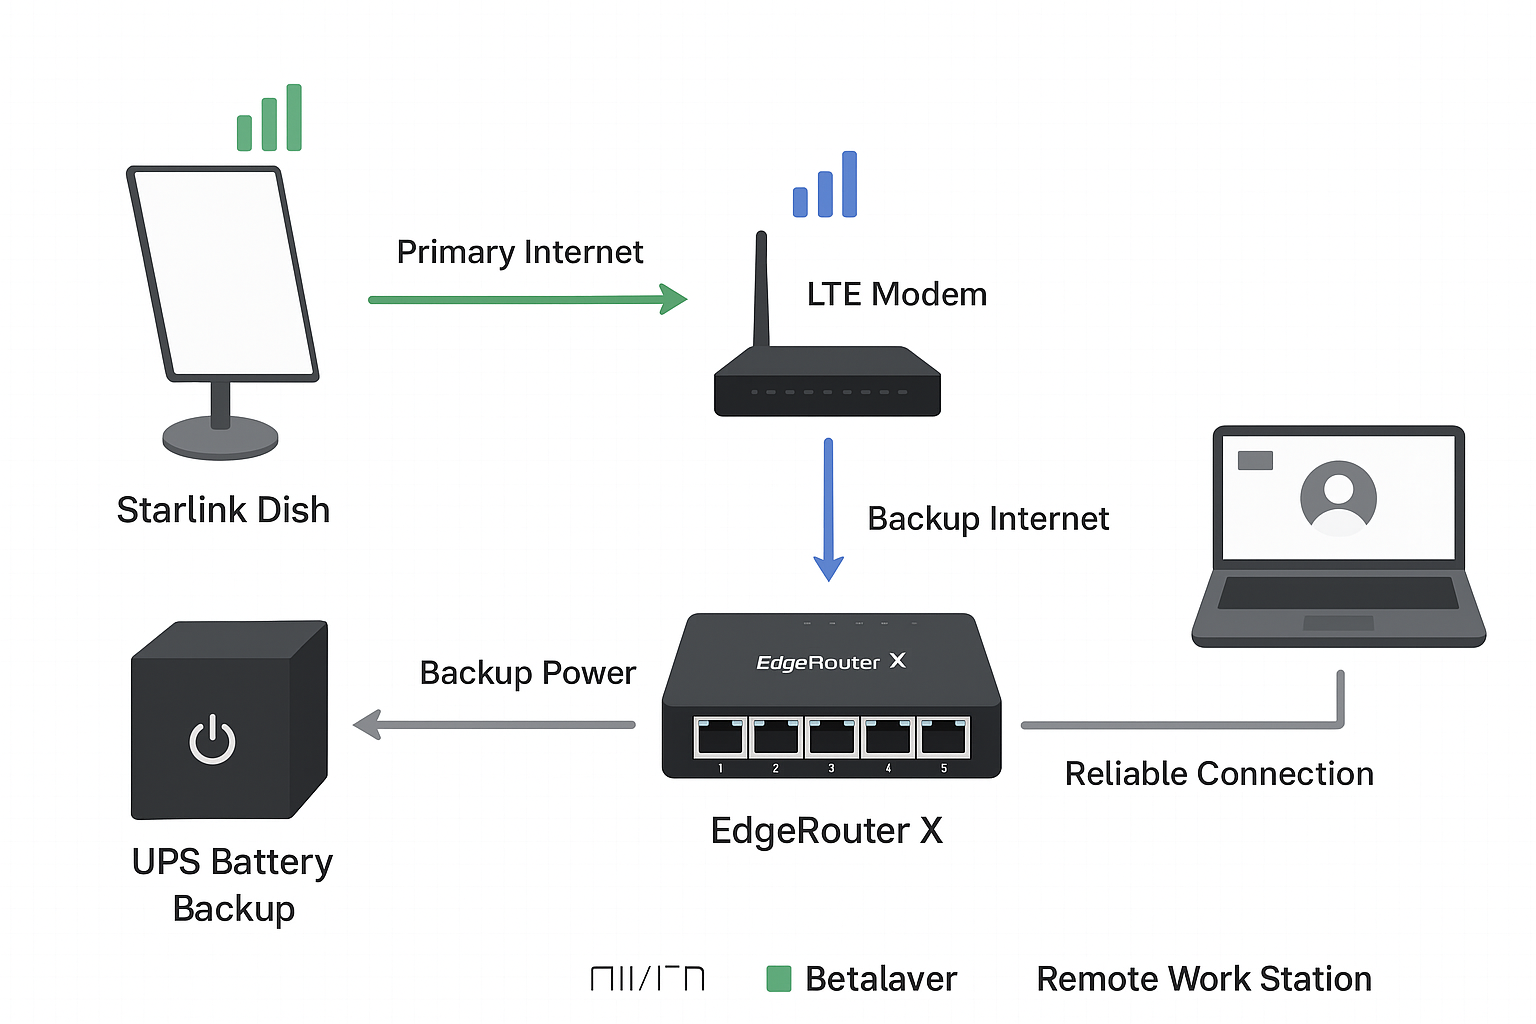
The EdgeRouter X acts as the brain of your backup internet setup, managing both your Starlink dish and your LTE modem. If you want a step-by-step setup and configuration, see my EdgeRouter X guide for Starlink LTE failover.
# Failover group
set load-balance group WAN-Failover interface eth0

set load-balance group WAN-Failover interface eth1 failover-only
# Starlink health checks (primary)
set load-balance group WAN-Failover interface eth0 route-test type ping target 1.1.1.1

set load-balance group WAN-Failover interface eth0 route-test type ping target 8.8.8.8

set load-balance group WAN-Failover interface eth0 route-test interval 15

set load-balance group WAN-Failover interface eth0 route-test count failure 4

set load-balance group WAN-Failover interface eth0 route-test count success 2
# LTE backup checks (secondary)
set load-balance group WAN-Failover interface eth1 route-test interval 30

set load-balance group WAN-Failover interface eth1 route-test count failure 3
# Smooth failback when Starlink returns
set load-balance group WAN-Failover flush-on-active enable

set load-balance group WAN-Failover lb-local-metric-change enable
commit; save
Why These Settings Work
- 15s interval + 4 failures → ignores Starlink’s normal 8–12s hiccups.
- Multiple ping targets → fewer false positives if one DNS server blips.
- Longer LTE check interval → prevents burning LTE data unnecessarily.
- Flush-on-active → clears stale sessions, avoiding “stuck” connections.
Advanced Tweaks to Avoid Common Outages
You don’t need all of these, but if you want rock-solid uptime:
MTU mismatch fix (common for LTE failovers):
set interfaces ethernet eth1 mtu 1460

set system ip tcp-mss 1420
DNS forwarding for stability (prevents LTE DNS drops):
set service dns forwarding listen-on switch0

set service dns forwarding name-server 1.1.1.1

set service dns forwarding name-server 8.8.8.8
Troubleshooting: If Failover Takes Too Long
If your router takes more than 30 seconds to switch to LTE when Starlink drops, here are a few common causes and quick fixes:
- Health-check interval too high → Try lowering it from 15s to 10s.
MTU mismatch between Starlink and LTE → Starlink defaults to 1500, but many LTE modems use 1460.
set interfaces ethernet eth1 mtu 1460

set system ip tcp-mss 1420- DHCP lease delays → If your LTE modem assigns IPs slowly, set a static IP where possible.
- DNS failures during transition → Configure multiple DNS targets (e.g. 1.1.1.1 and 8.8.8.8) instead of relying on your ISP’s defaults.
Old sessions hanging → Enable this if not already set:
set load-balance group WAN-Failover flush-on-active enable
Real-World Results
- Average failover → ~12 seconds
- False failovers → 2 in 8 months
- Zoom / video calls survive → 94% of Starlink outages
- Manual intervention needed → almost never
Bottom line: This configuration gives you true failover. Starlink stays primary, LTE kicks in only when needed, and your data bill stays safe.
How to Stop Starlink From Killing Your Remote Work Income: Key Lessons Learned
After months of living with a Starlink + LTE failover setup, here’s what experience and a few unexpected disasters taught me:
1. Uninterruptible Power Is Non-Negotiable
Even a brief grid flicker can kill both Starlink and LTE unless the router, modem, and Starlink dish are on a UPS. Don’t guess. Calculate your actual runtime under load:
- Starlink: ~40W
- Router: ~15W
- LTE modem: ~25W
- Switch (if any): ~5W
A 650VA UPS usually buys ~45 minutes of runtime. For rural areas prone to storms, aim for at least 1 hour of backup power.
2. Watch Out for Starlink Bypass Mode Resets
Starlink firmware updates can silently reset bypass mode back to default. When this happens, all your traffic routes through Starlink’s router, breaking port forwarding and failover monitoring. If you want a reliable setup, here’s a quick guide on how to use your own router with Starlink with bypass mode.
Quick Fix:
curl -X POST http://192.168.100.1/api/settings \
-d ‘{“bypass”: true}’ \
-H “Content-Type: application/json”
Always verify after updates using:
curl http://192.168.100.1/api/status | grep bypass
3. LTE Backup Isn’t Always Reliable Year-Round
Seasonal LTE performance shifts. In rural areas, winter tree loss can expose you to tower interference you didn’t notice in summer. If speeds drop or backups fail, try:
- Walking your property with the CellMapper app to find the strongest LTE spot
- Moving your modem near a 2nd-story window facing the nearest tower
- Avoid mounting LTE antennas near Starlink dishes or metal roofing
4. Mount for Access, Not Just Signal
Yes, mounting your Starlink dish higher improves LOS (line of sight), but too high creates maintenance headaches. 12–15 feet above ground is the sweet spot:
- High enough to avoid snow accumulation
- Low enough to sweep it off safely with a broom
- Reduces wind stress compared to roof peaks
5. Plan Data Usage for the Worst Week, Not the Average
LTE data plans disappear fast during extended outages. One snowstorm weekend chewed through 10GB in a day.
- Track your highest-usage months
- Choose a plan that covers peak emergencies, not “typical” weeks
Conclusion
Starlink has changed what’s possible in rural living. Speeds that once felt like city luxuries are now an everyday reality, but no single link is bulletproof. The answer isn’t chasing perfection; it’s building a backup that’s good enough to keep you working, streaming, and connected even when the sky goes dark.
If you’re ready to go deeper, check out my guide to the best LTE/5G dual-SIM routers for reliable failover, learn what to do if Starlink bypass mode isn’t working after reset, or explore the full Starlink router settings configuration guide to fine-tune your setup.
Have you had your own setup or tweaks that worked better? Share them. I’m always learning from other builders in the field.