

This Starlink router bypass guide: how to use your own router is for anyone who’s hit the limits of the default starlink router. You got starlink working, your speeds look great, but now you’re smacking into those limits. I’ve been there, and so have thousands of other users dealing with the same gaps.
Here’s what kept bugging me during 18 months of testing across different setups:
Coverage gaps: My 2,400 sq. ft. two-story house had the Gen 2 router dropping to –78 dBm in upstairs bedrooms. Gen 3 helped, but I still got dead zones until I added mesh.
Smart home nightmares: Tried setting up a Wyze cam last month and it was a total mess. The Starlink router mixes 2.4 GHz and 5 GHz together, so the cam wouldn’t connect. Had to use a separate router with dedicated 2.4 GHz just to make it work.
These issues pop up everywhere: gaming forums, rural Facebook groups, Reddit threads. Starlink’s router is built for simplicity, not flexibility. Perfect for basic streaming, but you’ll hit a wall when you need more.
I’ve tested Gen 1, Gen 2, Gen 3, and the Mini across real homes, workshops, and smart home setups with 60+ devices. This guide covers everything I learned about getting past those router limitations.
You’ll learn exactly how to:
- Connect your own router without breaking the Starlink connection
- Fix bypass mode when it fails and leaves you offline
- Pick the right mesh or gaming router for your specific setup
If the default Starlink router isn’t cutting it for your needs, here’s how to upgrade without the headaches.
Table of Contents
Starlink Router Hardware Reality Check – Gen 1, Gen 2, Gen 3, and Mini Compared
Your Starlink generation decides everything about adding your own router. I found this out the expensive way after buying the wrong adapter for a Gen 3 setup. Here’s what actually works with each version:
Gen 1 (2020–2021)
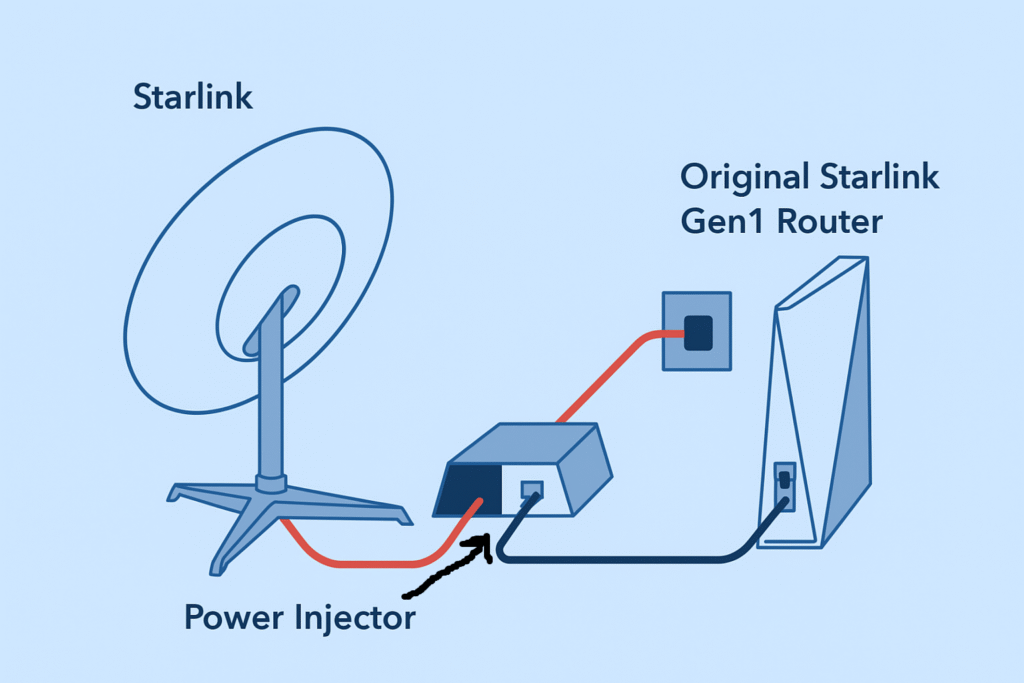
- Design: Separate dish and router with built-in Ethernet port
- The sweet spot: Just plug in any router, no bypass mode, no adapters needed
- Real test: Connected an Asus RT-AX88U and got rock-solid speeds around 190–210 Mbps with way better coverage across a 2-story house.
- Bottom line: If you have Gen 1, you won the router upgrade jackpot
Gen 2 (2021–2023)
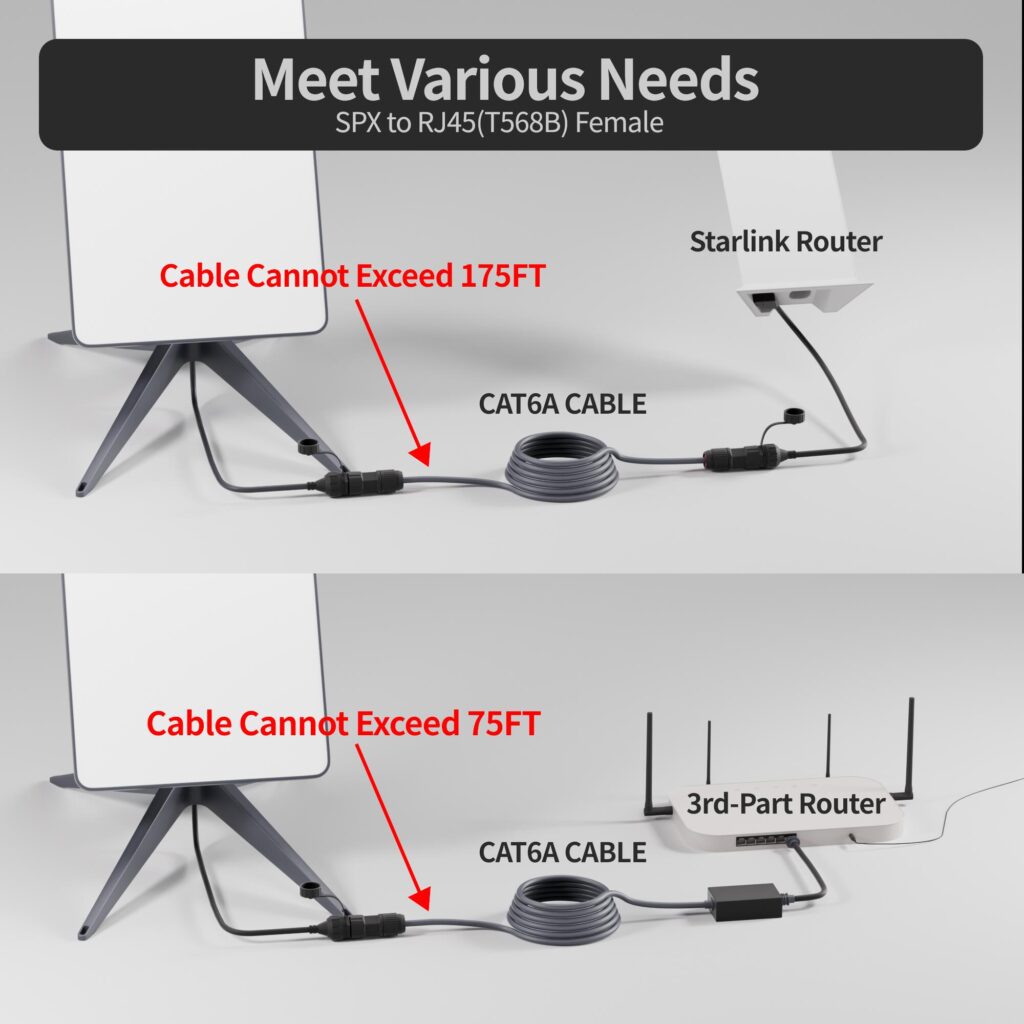
- Design: Dish and router are one unit. Need the $25 Starlink Ethernet adapter plus bypass mode
- The gotcha: Bypass mode crashes more often than Starlink wants to admit. When it dies, you’re stuck doing a 6-cycle power reset ritual
- Real test: Eero Pro 6 mesh finally pushed signal to my detached garage at 120 feet (–68 dBm) where the stock router gave me zilch
- Bottom line: Amazing results once it’s running, but get ready for setup headaches
Gen 3 (Late 2023–Present)
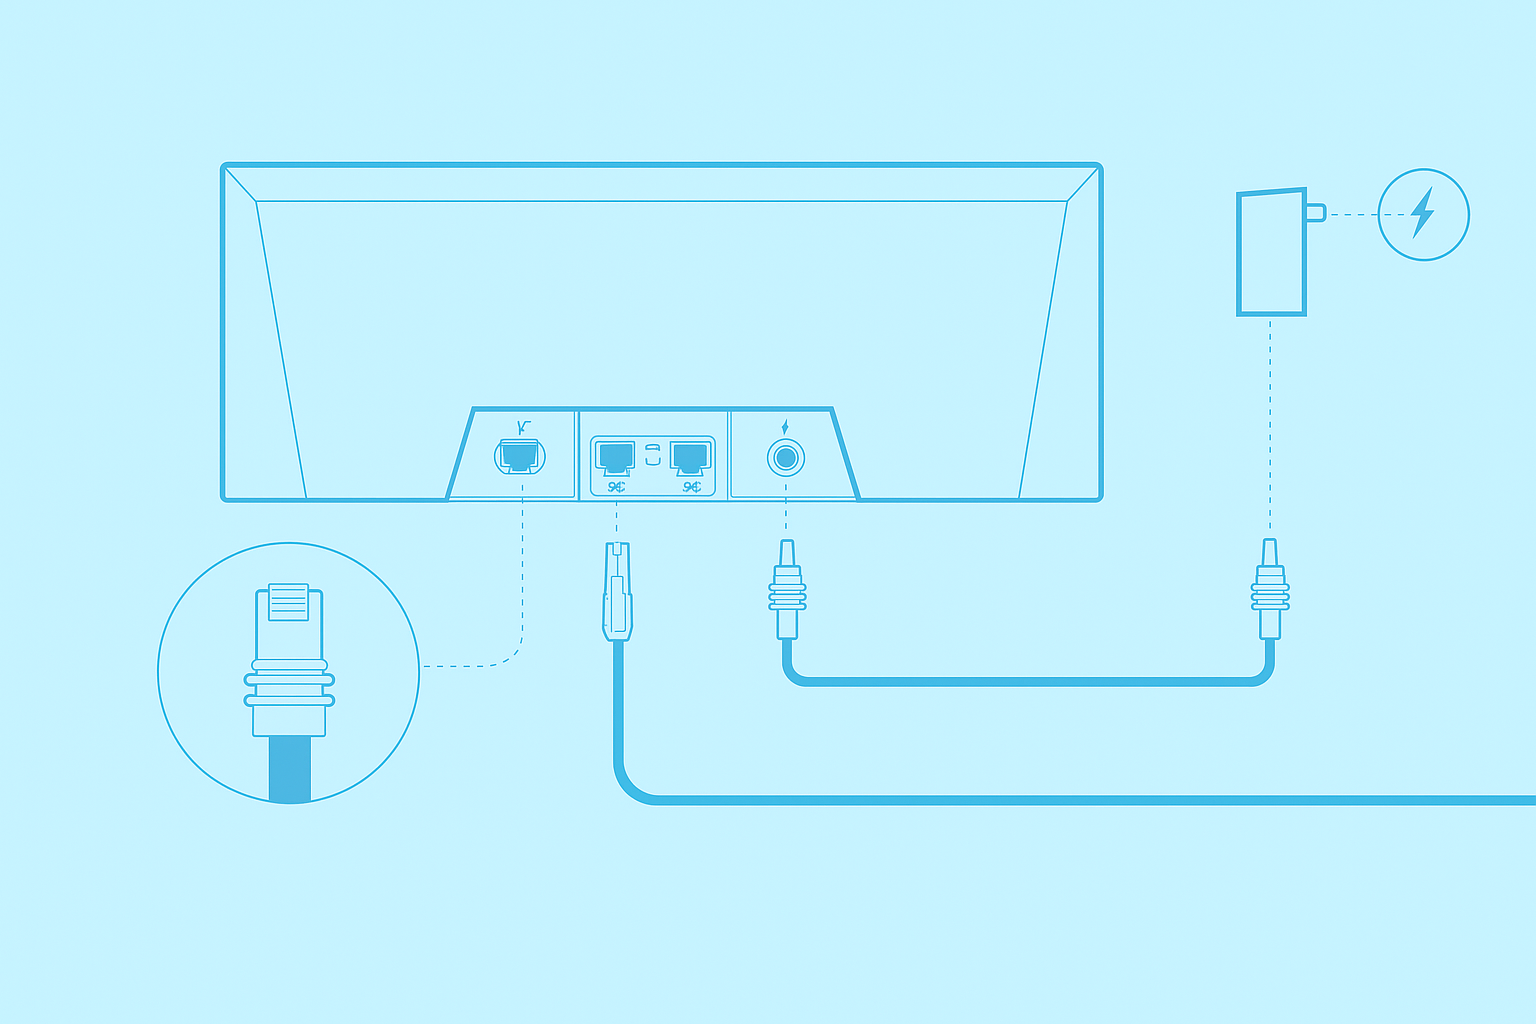
- Design: Wi-Fi 6 tower with 2 built-in Ethernet ports, works with Starlink mesh nodes
- Performance jump: 20–30% better coverage than Gen 2, wiping out most single-floor dead zones
- The catch: Still no band splitting, no gaming QoS, and their mesh traps you in Starlink’s world
- Bottom line: Best stock performance, but power users still need to upgrade
Starlink Mini (2024–Present)
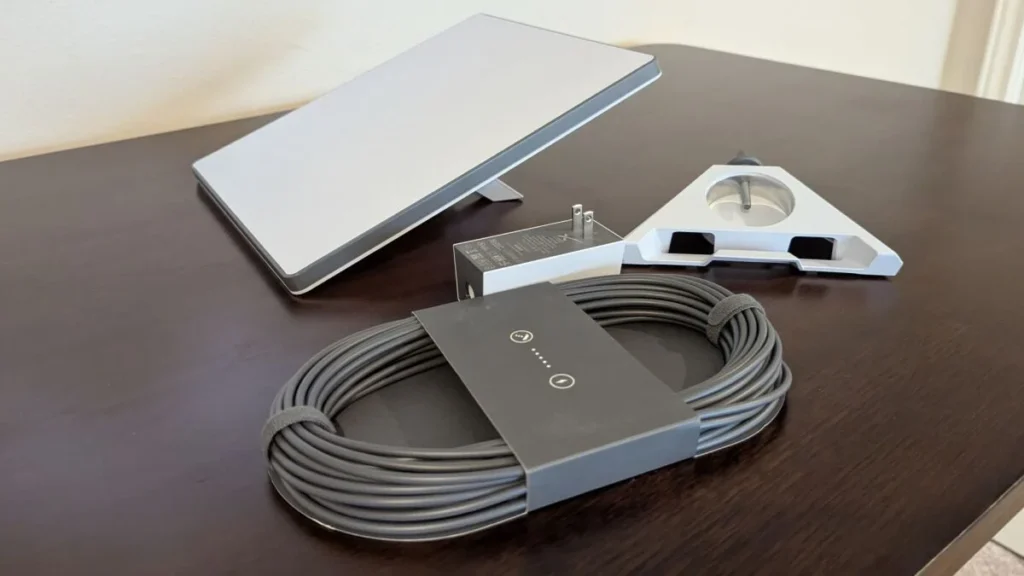
Image credit: PCMag
- Design: portable dish powered via the barrel-jack by default, but also supports USB-C input when paired with Starlink’s USB-C-to-5521 cable and a 100 W (20 V/5 A) USB-C PD source. Includes an Ethernet port that stays weatherproof only with Starlink’s cable.
- Tested performance: 110–130 Mbps indoors, but tanked under 25 Mbps at 80 feet outdoors (clear line of sight)
- Reality check: Perfect for RV trips, useless for whole-home coverage
These adapters are available directly from Starlink’s official shop if you don’t already have one.
When You Need to Replace Your Starlink Router (Signs and Symptoms)
The Starlink router handles basic streaming and browsing just fine for homes under 1,500 square feet. But you’ll definitely need an upgrade for gaming setups, smart home devices, or multi-floor coverage where the stock router can’t keep up. Skip Starlink’s $200 mesh nodes and grab their $25 Ethernet adapter with a $150-250 third-party router for better performance and total network control.
Starlink Bypass Mode: Complete Setup Guide and Fixes for Failed Connections
credit: spacelink-installations)
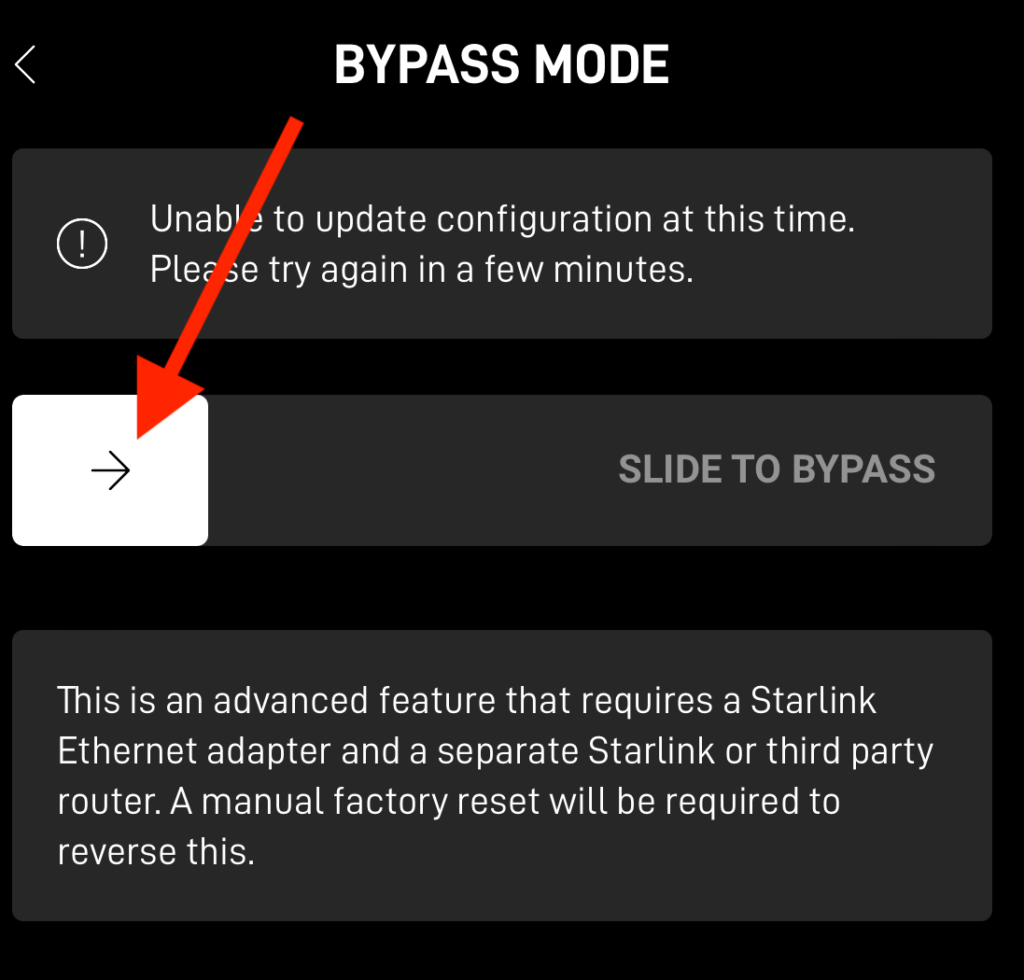
If there’s one place Starlink users get completely screwed, it’s bypass mode. Sounds simple on paper: turn off Starlink’s router features and let your own router run the show. In reality, it’s the biggest reason people lose their connection and end up factory-resetting hardware at 2 AM.
The real problem is that Starlink’s bypass mode isn’t a proper bridge. From what I’ve seen, if your replacement router isn’t powered up during bypass setup, the connection sometimes craps out and needs a reboot. This might not hit everyone, but it’s a setup gotcha that tons of users run into.
How Bypass Mode Plays Out by Generation
- Gen 1 (Round Dish) – Dead simple setup. Ethernet was already there; just swap your own router at the injector. No bypass mode, no lockout risk.
- Gen 2 (Rectangular Dish) – The nightmare one. Requires the $25 adapter and flipping bypass in the app. Order matters: your router has to be powered before the dish finishes rebooting, or you’re doing a full power-cycle dance.
- Gen 3 (Tower Router) – Much smoother. Two Ethernet ports right there. Bypass still goes through the app, but a quick reboot usually fixes problems without a full reset.
- Starlink Mini – compact and portable, with an RJ-45 Ethernet port hidden under a weather-sealed plug; to preserve its IP67 weather resistance, use Starlink’s Mini Ethernet cable. It handles travel routers well, though fixed setups are generally more stable.
Common Starlink Bypass Mode Failures and Quick Fixes
The most common mess is losing internet right after enabling bypass. That’s because the dish can’t find a live WAN handshake. The fix is straightforward but picky: power-cycle the dish with your own router already connected and running. Another trap is losing the Starlink app. In bypass, the app can’t “see” the network unless you keep a direct Wi-Fi connection to the Starlink router. Lock yourself out completely, and the only way back is a factory reset: hold the router’s button until the LEDs cycle.
Mesh is another headache. Once bypass kicks in, Starlink’s own mesh nodes become expensive paperweights. You have to swap them for a third-party mesh system (Eero, Orbi, Deco, whatever). And here’s a sneaky performance killer: if your router or adapter only handles 100 Mbps on its WAN port, Starlink speeds will look pathetic compared to the stock router.
Setup Success Tips Once you get bypass working right, it kills double-NAT problems and gives you full router control including QoS, advanced Wi-Fi tweaks, and gaming optimizations.
Fixing Starlink Wi-Fi Dead Zones with Mesh and Wired Backhaul
For multi-building properties, concrete buildings, and crazy long ranges way beyond normal home coverage, you need serious networking gear.
Concrete & Metal Building Nightmares Signal loss through reinforced walls is absolutely brutal. In my own test, the Gen 3 router went from –55 dBm in the living room to –82 dBm inside a concrete garage only 45 feet away, basically dead. Metal barns are even worse; Starlink Wi-Fi just bounces right off sheet steel. The fix isn’t cranking up power, it’s smart placement: run Ethernet or fiber into the building, then drop an access point inside. Using PoE (Power over Ethernet) saves you from running extra power cables.
Mesh System Reality Check Not all mesh systems play nice with Starlink. After beating up five different setups, Eero Pro 6+ and Asus AiMesh came out on top. Orbi and Deco work too, but only when you can wire the backhaul; over wireless, I consistently lost 30–40% of my speeds.
Wired Backhaul Setup If you can run a cable, absolutely do it. I buried Cat 6 in conduit and dropped a Ubiquiti access point 100 feet from the main house. The payoff: 210 Mbps down, exactly like sitting next to the Starlink router. For longer runs or outdoor spans, outdoor-rated fiber with media converters cuts out electrical interference, huge in barns with motors or welders.
Point-to-Point Wireless When digging trenches isn’t happening, directional wireless bridges work magic. I set up a pair of Ubiquiti NanoStation Loco M5 units between a farmhouse and metal shop 200 feet away. Line-of-sight delivered consistent 180 Mbps speeds, way better than mesh repeating. Catch: you have to aim them perfectly and need clear sightlines; even tree leaves will slash performance in half.
Best Routers and Mesh Systems That Work with Starlink
After testing setups across farms, workshops, and multi-story homes, here’s what I’d buy again:
For a detached garage or barn with wired connection: I dropped a Ubiquiti UniFi 6 LR access point connected via buried Cat 6 cable. Got 210+ Mbps in a concrete garage where the Starlink router had zero bars. Worth every penny of the $180 setup cost.
For wireless-only barn coverage: The NanoStation M5 pair saved my neighbor’s metal shop project. We mounted them 200 feet apart with clear line-of-sight and consistently hit 150-180 Mbps. You have to aim them spot-on, but once they’re locked in, they’re rock solid.
For whole-home mesh in bypass mode: After torturing five different systems, Eero Pro 6+ won for simplicity, it just works. Asus XT8 gives you more control if you want to tweak settings, but Eero requires zero setup headaches.
Budget option that blew my mind: TP-Link EAP225 access point for $60. Connected it via Ethernet to kill a dead zone upstairs, and it delivered 160 Mbps real speeds. Not fancy, but gets the job done.
The biggest lesson: wired backhaul crushes everything. Mesh over wireless sounds convenient, but I consistently lost 30-40% of my speeds. Once you need coverage past one building, forget about stretching Starlink’s Wi-Fi, run that cable if you possibly can.
Starlink Gaming Performance: NAT Type and Latency Issues
Starlink gaming isn’t broken by satellite lag (55-70ms is totally playable), it’s murdered by CGNAT. Every Starlink connection shares public IP addresses across thousands of users, so your console gets stuck with a private IP (100.64.x.x) that forces NAT Type Strict across all generations.
Starlink and Triple NAT Explained: Without bypass mode, you’re stacking three NAT layers: Starlink’s CGNAT plus their router’s NAT plus your router’s NAT. This absolutely destroys party chat and makes matchmaking take forever, like 5+ minutes.
What Actually Helps Bypass mode with a gaming router gets you down to NAT Type Moderate with 60ms ping. Games like Call of Duty and Apex run perfectly fine on Moderate NAT, just expect 30-45 second longer queue times versus Open NAT players. Gaming VPNs tack on 12-18ms overhead but give you smoother routing during peak hours.
Gaming Router QoS Settings for Starlink: Gaming routers can’t magically fix CGNAT, but decent QoS stops Netflix from spiking your ping mid-match. Set console traffic to high priority and reserve 25% bandwidth. This dropped my ping spikes from 180ms to 75ms when everyone else was streaming.
The Only Real NAT Fix Starlink doesn’t hand out static IPs. Public IPv4 addresses are only available on Business/Priority plans, not for regular residential users. That can help with inbound connections, but most home users stay stuck behind CGNAT. For most players, Moderate NAT still handles 95% of gaming without paying extra.
Using Smart Home Devices on Starlink Wi-Fi
Smart home failures aren’t about Starlink’s speed, they’re about device compatibility during setup. Most IoT devices hunt for 2.4GHz-only networks during pairing, but modern routers mash 2.4GHz and 5GHz under one name. When your phone grabs 5GHz, your Ring camera only sees 2.4GHz, completely breaking the setup process.
Solutions That Actually Work Create a dedicated 2.4GHz network on your replacement router just for device onboarding. Name it something like “IoT_Setup” and use it only for getting stubborn devices connected. For devices that hate mixed networks permanently, keep a separate 2.4GHz IoT network with guest network isolation for security.
Old Device Workarounds Pre-2015 thermostats and security panels often need WPA2 instead of WPA3, or require 802.11g compatibility modes. Rather than weakening your main network, use a secondary access point with legacy settings that’s isolated through VLAN setup.
Quick Fixes Force your phone onto 2.4GHz during setup by walking farther from the router until 5GHz signal dies. Temporarily kill WPA3 for device pairing, then flip it back on after connection. Most router guest networks run in compatibility mode by default, fixing many connection headaches instantly.
Advanced Users Setup
Business setups can implement VLANs for network isolation, and prosumer routers support WAN failover between Starlink and cellular backup connections. However, Starlink’s CGNAT prevents hosting inbound VPN servers without cloud relay workarounds.
Starlink Router Troubleshooting: No Internet After Bypass
No Internet After Bypass” – The Big One Check if your Ethernet adapter is seated properly (these things love to work loose) and make sure it’s plugged into your router’s WAN port, not LAN. Double-check that router WAN is set to DHCP since Starlink won’t give you PPPoE or static without special arrangements. Power-cycle both dish and router at the same time if the connection craps out.
Speed Drops with Custom Router Check MTU settings since Starlink needs 1500 MTU; wrong values kill your throughput. Turn off heavy firewall features (DPI, IDS/IPS) that choke at 300-500 Mbps on home hardware. Check your cable quality since old Cat5e or water-damaged runs will cap speeds way below what your dish can handle.
Mesh Won’t Connect Starlink’s proprietary mesh nodes only play nice with Starlink routers, they’re useless in bypass mode. Third-party mesh systems need brand-matching (Asus with Asus, Eero with Eero). Look for AP mode vs Router mode fights that block node discovery.
App Goes Dark In bypass mode, the Starlink app loses network sight unless you keep a direct Wi-Fi connection to the Starlink router. Complete lockout means factory reset via button hold until LED cycling. Keep one device connected to Starlink Wi-Fi so you can still use the app.
Conclusion
Learning how to use your own router with Starlink completely transforms your connection from basic internet access to a rock-solid professional network. Treat Starlink like a modem in bypass mode and pair it with hardware that actually fits your needs.
The formula always works: Starlink handles satellite connectivity, your router handles network smarts. This setup scales from gaming rigs to farm-wide mesh networks without killing performance.
Still stuck during your router upgrade? Drop a comment below with your specific setup and problem. I check these all the time and help troubleshoot real issues.
Related Guides You’ll Find Useful:
Why Is My Starlink Slow? Easy Fixes That Actually Work
EdgeRouter X guide for Starlink LTE failover – How to keep internet online when Starlink drops.
Best alternative mesh Wi-Fi systems for Starlink – Get better coverage than the default Starlink router.
Frequently Asked Questions (FAQ)
Can I use a mesh system with Starlink?
Yes, Starlink works well with most third-party mesh systems. Just make sure to disable Starlink’s Wi-Fi if using mesh to avoid conflicts.
What router works best for Starlink internet?
Routers like Eero Pro, TP-Link Deco, ASUS RT-AX series, and Netgear Orbi are great options. Look for models with good range, tri-band support, and Ethernet backhaul for best performance.
Can I use Starlink + my router at the same time (without bypass mode)?
Yes, but it’s not recommended. Running both creates a double NAT, which can affect online gaming, VPNs, and smart devices.
Will bypass mode improve latency or speed?
Bypass mode may reduce latency and network conflicts by removing Starlink’s built-in router from the path. It creates a cleaner setup, especially useful for advanced routers or mesh systems.
5 Comments
😊😊😊😊😊😍😍😍
GREAT 😊😊😊😊😊😍😍😍
Pingback: Best Mesh Wi-Fi for Starlink in 2025: Tested for Large Homes
Pingback: Starlink Mesh Wi-Fi Not Working? Real Fixes That Actually Work
Pingback: Starlink Router vs Mesh System: Which is Better